mscharhag, Programming and Stuff;

A blog about programming and software development topics, mostly focused on Java technologies including Java EE, Spring and Grails.

  • Sunday, 21 September, 2014

    Reduce Boilerplate Code in your Java applications with Project Lombok

    One of the most frequently voiced criticisms of the Java programming language is the amount of Boilerplate Code it requires. This is especially true for simple classes that should do nothing more than store a few values. You need getters and setters for these values, maybe you also need a constructor, overriding equals() and hashcode() is often required and maybe you want a more useful toString() implementation. In the end you might have 100 lines of code that could be rewritten with 10 lines of Scala or Groovy code. Java IDEs like Eclipse or IntelliJ try to reduce this problem by providing various types of code generation functionality. However, even if you do not have to write the code yourself, you always see it (and get distracted by it) if you open such a file in your IDE.

    Project Lombok (don't be frightened by the ugly web page) is a small Java library that can help reducing the amount of Boilerplate Code in Java Applications. Project Lombok provides a set of annotations that are processed at development time to inject code into your Java application. The injected code is immediately available in your development environment.
    Lets have a look at the following Eclipse Screenshot:

    Eclipse Outline with Lombok generated methods

    The defined class is annotated with Lombok's @Data annotation and does not contain any more than three private fields. @Data automatically injects getters, setters (for non final fields), equals(), hashCode(), toString() and a constructor for initializing the final dateOfBirth field. As you can see the generated methods are directly available in Eclipse and shown in the Outline view.

    Setup

    To set up Lombok for your application you have to put lombok.jar to your classpath. If you are using Maven you just have to add to following dependency to your pom.xml:

    <dependency>
      <groupId>org.projectlombok</groupId>
      <artifactId>lombok</artifactId>
      <version>1.14.8</version>
      <scope>provided</scope>
    </dependency>

    You also need to set up Lombok in the IDE you are using:

    • NetBeans users just have to enable the Enable Annotation Processing in Editor option in their project properties (see: NetBeans instructions).
    • Eclipse users can install Lombok by double clicking lombok.jar and following a quick installation wizard.
    • For IntelliJ a Lombok Plugin is available.

    Getting started with Lombok

    The @Data annotation shown in the introduction is actually a shortcut for various other Lombok annotations. Sometimes @Data does too much. In this case, you can fall back to more specific Lombok annotations that give you more flexibility.

    Generating only getters and setters can be achieved with @Getter and @Setter:

    @Getter
    @Setter
    public class Person {
      private final LocalDate birthday;
      private String firstName;
      private String lastName;
    
      public Person(LocalDate birthday) {
        this.birthday = birthday;
      }
    }

    Note that getter methods for boolean fields are prefixed with is instead of get (e.g. isFoo() instead of getFoo()). If you only want to generate getters and setters for specific fields you can annotate these fields instead of the class.

    Generating equals(), hashCode() and toString():

    @EqualsAndHashCode
    @ToString
    public class Person {
      ...
    }

    @EqualsAndHashCode and @ToString also have various properties that can be used to customize their behaviour:

    @EqualsAndHashCode(exclude = {"firstName"})
    @ToString(callSuper = true, of = {"firstName", "lastName"})
    public class Person {
      ... 
    }

    Here the field firstName will not be considered by equals() and hashCode(). toString() will call super.toString() first and only consider firstName and lastName.

    For constructor generation multiple annotations are available:

    • @NoArgsConstructor generates a constructor that takes no arguments (default constructor).
    • @RequiredArgsConstructor generates a constructor with one parameter for all non-initialized final fields.
    • @AllArgsConstructor generates a constructor with one parameter for all fields in the class.

    The @Data annotation is actually an often used shortcut for @ToString, @EqualsAndHashCode, @Getter, @Setter and @RequiredArgsConstructor.

    If you prefer immutable classes you can use @Value instead of @Data:

    @Value
    public class Person {
      LocalDate birthday;
      String firstName;
      String lastName;
    }

    @Value is a shortcut for @ToString, @EqualsAndHashCode, @AllArgsConstructor, @FieldDefaults(makeFinal = true, level = AccessLevel.PRIVATE) and @Getter.

    So, with @Value you get toString(), equals(), hashCode(), getters and a constructor with one parameter for each field. It also makes all fields private and final by default, so you do not have to add private or final modifiers.

    Looking into Lombok's experimental features

    Besides the well supported annotations shown so far, Lombok has a couple of experimental features that can be found on the Experimental Features page.

    One of these features I like in particular is the @Builder annotation, which provides an implementation of the Builder Pattern.

    @Builder
    public class Person {
      private final LocalDate birthday;
      private String firstName;
      private String lastName;
    }

    @Builder generates a static builder() method that returns a builder instance. This builder instance can be used to build an object of the class annotated with @Builder (here Person):

    Person p = Person.builder()
      .birthday(LocalDate.of(1980, 10, 5))
      .firstName("John")
      .lastName("Smith")
      .build();


    By the way, if you wonder what this LocalDate class is, you should have a look at my blog post about the Java 8 date and time API ;-)

    Conclusion

    Project Lombok injects generated methods, like getters and setters, based on annotations. It provides an easy way to significantly reduce the amount of Boilerplate code in Java applications.

    Be aware that there is a downside: According to reddit comments (including a comment of the project author), Lombok has to rely on various hacks to get the job done. So, there is a chance that future JDK or IDE releases will break the functionality of project Lombok. On the other hand, these comments where made 5 years ago and Project Lombok is still actively maintained.

    You can find the source of Project Lombok on GitHub.

  • Friday, 15 August, 2014

    Understanding JUnit's Runner architecture

    Update (2020): This post describes how JUnit 4 runners work and how you can create you own JUnit 4 runner. Please note that JUnit 5 is available for few years now (it has been released 2017). Maybe you should consider updating your project to JUnit 5 if you are still using JUnit 4. If you are interested in JUnit 5 you might be interested in my article about creating custom extensions for JUnit 5.


    Some weeks ago I started creating a small JUnit Runner. I learned that creating custom JUnit Runners is actually quite simple. In this post I want to show you how JUnit Runners work internally and how you can use custom Runners to modify the test execution process of JUnit.

    So what is a JUnit Runner?

    A JUnit Runner is class that extends JUnit's abstract Runner class. Runners are used for running test classes. The Runner that should be used to run a test can be set using the @RunWith annotation.

    @RunWith(MyTestRunner.class)
    public class MyTestClass {
    
      @Test
      public void myTest() {
        ..
      }
    }

    JUnit tests are started using the JUnitCore class. This can either be done by running it from command line or using one of its various run() methods (this is what your IDE does for you if you press the run test button).

    JUnitCore.runClasses(MyTestClass.class);

    JUnitCore then uses reflection to find an appropriate Runner for the passed test classes. One step here is to look for a @RunWith annotation on the test class. If no other Runner is found the default runner (BlockJUnit4ClassRunner) will be used. The Runner will be instantiated and the test class will be passed to the Runner. Now it is Job of the Runner to instantiate and run the passed test class.

    How do JUnit Runners work?

    Lets look at the class hierarchy of standard JUnit Runners:

    Runner is a very simple class that implements the Describable interface and has two abstract methods:

    public abstract class Runner implements Describable {
    
      public abstract Description getDescription();
    
      public abstract void run(RunNotifier notifier);
    }

    The method getDescription() is inherited from Describable and has to return a Description. Descriptions contain the information that is later being exported and used by various tools. For example, your IDE might use this information to display the test results.
    run() is a very generic method that runs something (e.g. a test class or a test suite). I think usually Runner is not the class you want to extend (it is just too generous).

    In ParentRunner things get a bit more specific. ParentRunner is an abstract base class for Runners that have multiple children. It is important to understand here, that tests are structured and executed in a hierarchical order (think of a tree).
    For example: You might run a test suite which contains other test suites. These test suites then might contain multiple test classes. And finally each test class can contain multiple test methods.

    ParentRunner has the following three abstract methods:

    public abstract class ParentRunner<T> extends Runner implements Filterable, Sortable {    
    
      protected abstract List<T> getChildren();
    
      protected abstract Description describeChild(T child);
    
      protected abstract void runChild(T child, RunNotifier notifier);
    }

    Subclasses need to return a list of the generic type T in getChildren(). ParentRunner then asks the subclass to create a Description for each child (describeChild()) and finally to run each child (runChild()).

    Now let's look at two standard ParentRunners: BlockJUnit4ClassRunner and Suite.

    BlockJUnit4ClassRunner is the default Runner that is used if no other Runner is provided. So this is the Runner that is typically used if you run a single test class. If you look at the source of BlockJUnit4ClassRunner you will see something like this:

    public class BlockJUnit4ClassRunner extends ParentRunner<FrameworkMethod> {
    
      @Override
      protected List<FrameworkMethod> getChildren() {
        // scan test class for methonds annotated with @Test
      }
    
      @Override
      protected Description describeChild(FrameworkMethod method) {
        // create Description based on method name
      }
    
      @Override
      protected void runChild(final FrameworkMethod method, RunNotifier notifier) {
        if (/* method not annotated with @Ignore */) {
          // run methods annotated with @Before
          // run test method
          // run methods annotated with @After
        }
      }
    }

    Of course this is overly simplified, but it shows what is essentially done in BlockJUnit4ClassRunner.

    The generic type parameter FrameworkMethod is basically a wrapper around java.lang.reflect.Method providing some convenience methods. In getChildren() the test class is scanned for methods annotated with @Test using reflection. The found methods are wrapped in FrameworkMethod objects and returned. describeChildren() creates a Description from the method name and runChild() finally runs the test method. BlockJUnit4ClassRunner uses a lot of protected methods internally. Depending on what you want to do exactly, it can be a good idea to check BlockJUnit4ClassRunner for methods you can override. You can have a look at the source of BlockJUnit4ClassRunner on GitHub.

    The Suite Runner is used to create test suites. Suites are collections of tests (or other suites). A simple suite definition looks like this:

    @RunWith(Suite.class)
    @Suite.SuiteClasses({
      MyJUnitTestClass1.class,
      MyJUnitTestClass2.class,
      MyOtherTestSuite.class
    })
    public class MyTestSuite {}

    A test suite is created by selecting the Suite Runner with the @RunWith annotation. If you look at the implementation of Suite you will see that it is actually very simple. The only thing Suite does, is to create Runner instances from the classes defined using the @SuiteClasses annotation. So getChildren() returns a list of Runners and runChild() delegates the execution to the corresponding runner.

    Examples for Custom JUnit runners

    With the provided information it should not be that hard to create your own JUnit Runner (at least I hope so). If you are looking for some example custom Runner implementations you can have a look at the following list:

    Conclusion

    JUnit Runners are highly customizable and give you the option to change to complete test execution process. The cool thing is that can change the whole test process and still use all the JUnit integration points of your IDE, build server, etc.

    If you only want to make minor changes it is a good idea to have a look at the protected methods of BlockJUnit4Class runner. Chances are high you find an overridable method at the right location.

    In case you are interested in Olaester, you should have a look at my blog post: An alternative approach of writing JUnit tests.

  • Wednesday, 6 August, 2014

    Using IntelliJ bookmarks

    This is a quick post about IntelliJ's nice bookmark feature.

    IntelliJ gives you the option to bookmark single lines of code. After a line has been bookmarked, you can use various ways to jump directly back to this line. So it can be a good idea to bookmarks code locations you often work with.

    To create a new bookmark you only have to press F11 inside the code editor. Bookmarked lines show a small checkmark next to the line number.
     

    intellij bookmark

    Bookmarks can be removed by selecting the bookmarked line and pressing F11 again.

    To see all bookmarks you can press Shift - F11. This opens a small popup window which shows a list of all bookmarks you have created.
     

    intellij bookmark popup


    Note that this window can completely controlled using the keyboard:


    • With Up / Down you can browse the list of bookmarks
    • With Enter you jump to the selected bookmark
    • Esc closes the window
    • A bookmark can be moved up or down using Alt - Up / Alt - Down

    Note that you can also add a mnemonic identifier to a bookmark. You do this by selecting a line and pressing Ctrl - F11. This opens a small menu in which you can choose a mnemonic identifier (which is a character or a number).


    intellij bookmark identifier popup

    You can choose an identifier by clicking on one of the menu buttons or by simply pressing the corresponding key on your keyboard.

    Bookmark mnemonics are also shown next to the line number. In the following image 1 was choosen as mnemonic.


    intellij bookmark mnemonic


    Mnemonics give you the option to move even quicker between bookmarks. You can directly jump to a mnemonic bookmark by opening the bookmark popup (Shift - F11) and pressing the mnemonic key (1 in this example).

    For numerical bookmarks even more shortcuts are available. You can toggle a numeric mnemonic on a selected line by pressing Ctrl - Shift - <number>. If you want to jump to a numeric mnemonic you use the Ctrl - <number> shortcut.

    For example: Ctrl - 5 brings you directly to the mnemonic bookmark 5.

  • Saturday, 12 July, 2014

    An alternative approach of writing JUnit tests (the Jasmine way)

    Recently I wrote a lot of Jasmine tests for a small personal project. It took me some time until I finally got the feeling of getting the tests right. After this, I always have a hard time when I am switching back to JUnit tests. For some reason JUnit tests did no longer feel that good and I wondered if it would be possible to write JUnit tests in a way similar to Jasmine tests.

    Jasmine is a popular Behavior Driven Development testing framework for JavaScript that is inspired by RSpec (a Ruby BDD testing Framework).

    A simple Jasmine test looks like this:

    describe('AudioPlayer tests', function() {
      var player;
    
      beforeEach(function() {
        player = new AudioPlayer();
      });
      
      it('should not play any track after initialization', function() {
        expect(player.isPlaying()).toBeFalsy();
      });
      
      ...
    });

    The describe() function call in the first line creates a new test suite using the description AudioPlayer tests. Inside a test suite we can use it() to create tests (called specs in Jasmine). Here, we check if the isPlaying() method of AudioPlayer returns false after creating a new AudioPlayer instance.
    The same test written in JUnit would look like this:

    public class AudioPlayerTest {
      private AudioPlayer audioPlayer;
    
      @Before 
      public void before() {
        audioPlayer = new AudioPlayer();
      }
    
      @Test
      void notPlayingAfterInitialization() {
        assertFalse(audioPlayer.isPlaying());
      }
      
      ...
    }

    Personally I find the Jasmine test much more readable compared to the JUnit version. In Jasmine the only noise that does not contribute anything to the test are the braces and the function keyword. Everything else contains some useful information.
    When reading the JUnit test we can ignore keywords like void, access modifiers (private, public, ..), annotations and irrelevant method names (like the name of the method annotated with @Before). In addition to that, test descriptions encoded in camel case method names are not that great to read.

    Besides increased readability I really like Jasmine's ability of nesting test suites.
    Let's look at an example that is a bit longer:

    describe('AudioPlayers tests', function() {
      var player;
    
      beforeEach(function() {
        player = new AudioPlayer();
      });
      
      describe('when a track is played', function() {
        var track;
      
        beforeEach(function() {
          track = new Track('foo/bar.mp3')
          player.play(track);
        });
        
        it('is playing a track', function() {
          expect(player.isPlaying()).toBeTruthy();
        });
        
        it('returns the track that is currently played', function() {
          expect(player.getCurrentTrack()).toEqual(track);
        });
      });
      
      ...
    });

    Here we create a sub test suite that is responsible for testing the behavior when a Track is played by AudioPlayer. The inner beforeEach() call is used to set up a common precondition for all tests inside the sub test suite.

    In contrast, sharing common preconditions for multiple (but not all) tests in JUnit can become cumbersome sometimes. Of course duplicating the setup code in tests is bad, so we create extra methods for this. To share data between setup and test methods (like the track variable in the example above) we then have to use member variables (with a much larger scope).
    Additionally we should make sure to group tests with similar preconditions together to avoid the need of reading the whole test class to find all relevant tests for a certain situation. Or we can split things up into multiple smaller classes. But then we might have to share setup code between these classes...

    If we look at Jasmine tests we see that the structure is defined by calling global functions (like describe(), it(), ...) and passing descriptive strings and anonymous functions.

    With Java 8 we got Lambdas, so we can do the same right?
    Yes, we can write something like this in Java 8:

    public class AudioPlayerTest {
      private AudioPlayer player;
      
      public AudioPlayerTest() {
        describe("AudioPlayer tests", () -> {
          beforeEach(() -> {
            player = new AudioPlayer();
          });
    
          it("should not play any track after initialization", () -> {
            expect(player.isPlaying()).toBeFalsy();
          });
        });
      }
    }

    If we assume for a moment that describe(), beforeEach(), it() and expect() are statically imported methods that take appropriate parameters, this would at least compile. But how should we run this kind of test?

    For interest I tried to integrate this with JUnit and it turned out that this actually very easy (I will write about this in the future). The result so far is a small library called Oleaster.

    A test written with Oleaster looks like this:

    import static com.mscharhag.oleaster.runner.StaticRunnerSupport.*;
    ...
    
    @RunWith(OleasterRunner.class)
    public class AudioPlayerTest {
      private AudioPlayer player;
      
      {
        describe("AudioPlayer tests", () -> {
          beforeEach(() -> {
            player = new AudioPlayer();
          });
        
          it("should not play any track after initialization", () -> {
            assertFalse(player.isPlaying());
          });
        });
      }
    }

    Only a few things changed compared to the previous example. Here, the test class is annotated with the JUnit @RunWith annotation. This tells JUnit to use Oleaster when running this test class. The static import of StaticRunnerSupport.* gives direct access to static Oleaster methods like describe() or it(). Also note that the constructor was replaced by an instance initializer and the Jasmine like matcher is replaced with by a standard JUnit assertion.

    There is actually one thing that is not so great compared to original Jasmine tests. It is the fact that in Java a variable needs to be effectively final to use it inside a lambda expression. This means that the following piece of code does not compile:

    describe("AudioPlayer tests", () -> {
      AudioPlayer player;
      beforeEach(() -> {
        player = new AudioPlayer();
      });
      ...
    });

    The assignment to player inside the beforeEach() lambda expression will not compile (because player is not effectively final). In Java we have to use instance fields in situations like this (like shown in the example above).

    In case you worry about reporting: Oleaster is only responsible for collecting test cases and running them. The whole reporting is still done by JUnit. So Oleaster should cause no problems with tools and libraries that make use of JUnit reports.

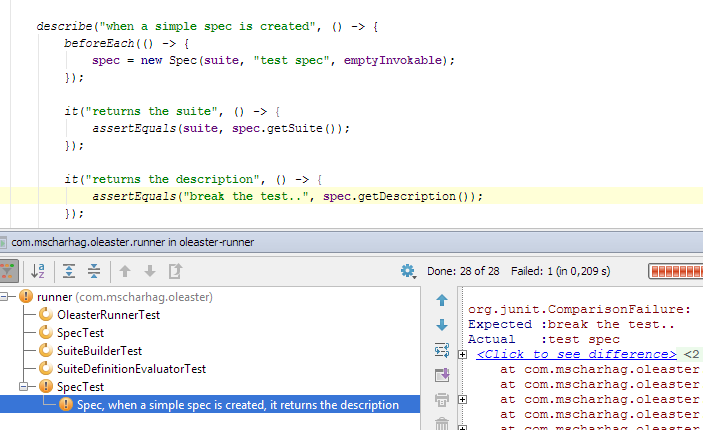
    For example the following screenshot shows the result of a failed Oleaster test in IntelliJ IDEA:


    If you wonder how Oleaster tests look in practice you can have a look at the tests for Oleaster (which are written in Oleaster itself). You can find the GitHub test directory here.

    Feel free to add any kind of feedback by commenting to this post or by creating a GitHub issue.

  • Sunday, 22 June, 2014

    Using Markdown syntax in Javadoc comments

    In this post we will see how we can write Javadoc comments using Markdown instead of the typical Javadoc syntax.

    So what is Markdown?

    Markdown is a plain text formatting syntax designed so that it optionally can be converted to HTML using a tool by the same name. Markdown is popularly used to format readme files, for writing messages in online discussion forums or in text editors for the quick creation of rich text documents.

    (Wikipedia: Markdown)

    Markdown is a very easy to read formatting syntax. Different variations of Markdown can be used on Stack Overflow or GitHub to format user generated content.

    Setup
    By default the Javadoc tool uses Javadoc comments to generate API documentation in HTML form. This process can be customized used Doclets. Doclets are Java programs that specify the content and format of the output of the Javadoc tool.

    The markdown-doclet is a replacement for the standard Java Doclet which gives developers the option to use Markdown syntax in their Javadoc comments. We can set up this doclet in Maven using the maven-javadoc-plugin.

    <build>
      <plugins>
        <plugin>
          <artifactId>maven-javadoc-plugin</artifactId>
          <version>2.9</version>
          <configuration>
            <doclet>ch.raffael.doclets.pegdown.PegdownDoclet</doclet>
            <docletArtifact>
              <groupId>ch.raffael.pegdown-doclet</groupId>
              <artifactId>pegdown-doclet</artifactId>
              <version>1.1</version>
            </docletArtifact>
            <useStandardDocletOptions>true</useStandardDocletOptions>
          </configuration>
        </plugin>
      </plugins>
    </build>


    Writing comments in Markdown
    Now we can use Markdown syntax in Javadoc comments:

    /**
     * ## Large headline
     * ### Smaller headline
     *
     * This is a comment that contains `code` parts.
     *
     * Code blocks:
     *
     * ```java
     * int foo = 42;
     * System.out.println(foo);
     * ```
     *
     * Quote blocks:
     *
     * > This is a block quote
     *
     * lists:
     *
     *  - first item
     *  - second item
     *  - third item
     *
     * This is a text that contains an [external link][link].
     *
     * [link]: http://external-link.com/
     *
     * @param id the user id
     * @return the user object with the passed `id` or `null` if no user with this `id` is found
     */
    public User findUser(long id) {
      ...
    }

    After running

    mvn javadoc:javadoc

    we can find the generated HTML API documentation in target/site/apidocs.
    The generated documentation for the method shown above looks like this:

    Generated Javadoc screenshot


    As we can see the Javadoc comments get nicely converted to HTML.

    Conclusion
    Markdown has the clear advantage over standard Javadoc syntax that the source it is far easier to read. Just have a look at some of the method comments of java.util.Map. Many Javadoc comments are full with formatting tags and are barely readable without any tool. But be aware that Markdown can cause problems with tools and IDEs that expect standard Javadoc syntax.

    You can find the source of this example project on GitHub.