mscharhag, Programming and Stuff;

A blog about programming and software development topics, mostly focused on Java technologies including Java EE, Spring and Grails.

  • Wednesday, 27 April, 2016

    Java EE 8 MVC: Global exception handling

    In the previous previous posts we learned about various ways to access request information (e.g. query or path parameters) in Java EE MVC. This post shows how to apply global exception handling to an MVC application.

    Assume we have a controller method that might throw an IllegalArgumentException:

    @Controller
    @Path("illegal-argument")
    public class ExceptionController {
    
      @GET
      public String doWork() {
        // code that might throw an IllegalArgumentException
      }
    
    }
    

    We could now add a try/catch block to doWork() and wrap the piece of code that might throw the exception. However, this approach becomes tedious if it needs to be applied to multiple methods.

    In such a case we can register a global exception mapper. To do this, we habe to create a class that implements the generic ExceptionMapper interface.

    A simple ExceptionMapper for IllegalArgumentExceptions looks like this:

    @Provider
    public class IllegalArgumentExceptionMapper implements ExceptionMapper<IllegalArgumentException> {
    
      @Inject
      private Models models;
    
      @Override
      public Response toResponse(IllegalArgumentException exception) {
        models.put("message", exception.getMessage());
    
        return Response.status(Response.Status.BAD_REQUEST)
            .entity("/WEB-INF/jsp/error.jsp")
            .build();
      }
    }
    

    Now, whenever an IllegalArgumentException is thrown from controller methods, IllegalArgumentExceptionMapper will be used to convert the exception to an appropriate response. Here a simple error view (error.jsp) is rendered.

    If you want a generic ExceptionMapper that handles all types of exceptions, you simply have to implement ExceptionMapper<Exception>. If you have multiple ExceptionMapper implementations that are suitable to handle a thrown exception, the most specific ExceptionMapper is used.

    Quick Summary

    Adding global exception handling to an Java EE MVC application is quite simple. We only have to create a class that implements the ExceptionMapper interface with the exception type that should be handled.

    The full example code can be found on GitHub.

  • Sunday, 3 April, 2016

    Simplifying nested loops with Java 8 Lambdas

    This is just a quick tip for everyone who often has to work with multi dimensional arrays in Java 8 (or newer).

    In this case you might often end with code similar to this:

    float[][] values = ...
    for (int i = 0; i < values.length; i++) {
      for (int k = 0; k < values[i].length; k++) {
        float value = values[i][k];
        // do something with i, k and value
      }
    }

    If you are lucky you can replace the loops with for-each loops. However, often the indices are required for computations inside the loop.

    In such a case you can come up with a simple utility method that looks like this:

    private void loop(float[][] values, BiConsumer<Integer, Integer> consumer) {
      for (int i = 0; i < values.length; i++) {
        for (int k = 0; k < values[i].length; k++) {
          consumer.accept(i, k);
        }
      }
    }
    

    We can now loop over array indices like this:

    float[][] values = ...
    loop(values, (i, k) -> {
      float value = values[i][k];
      // do something with i, k and value
    });
    

    This way you can keep the looping code out of your main logic.

    Of course you should change the shown loop() method so it fits your personal needs.


  • Wednesday, 30 March, 2016

    Retry handling with Spring-Retry

    Whenever software components communicate with each other, there is a chance for temporary self-correcting faults. Such faults include the temporary unavailability of a service, momentary loss of network connectivity, or timeouts that arise when a service is busy. In such situations a proper retry handling can reduce the problems these faults might cause.

    In this post we will see how Spring Retry can be used to add robust retry logic to Spring applications. Spring Retry is probably not that well know because it is not listed on the Spring documentation overview. However, you can find it on the Spring Initializr page.

    Setup

    To use Spring Retry we need to add the following dependency to our project:

    <dependency>
      <groupid>org.springframework.retry</groupid>
      <artifactid>spring-retry</artifactid>
      <version>1.1.2.RELEASE</version>
    </dependency>

    Spring Retry makes use of AOP, so make sure Spring AOP is available:

    <dependency>
      <groupid>org.springframework</groupid>
      <artifactid>spring-aop</artifactid>
      <version>4.2.5.RELEASE</version>
    </dependency>
    <dependency>
      <groupId>org.aspectj</groupId>
      <artifactId>aspectjweaver</artifactId>
      <version>1.8.8</version>
    </dependency>
    

    If you are using Spring Boot, you can use spring-boot-starter-aop instead:

    <dependency>
      <groupid>org.springframework.boot</groupid>
      <artifactid>spring-boot-starter-aop</artifactid>
    </dependency>
    

    To enable Spring Retry we simply have to add @EnableRetry to our application configuration class:

    @EnableRetry
    @SpringBootApplication // or @Configuration if you are not using Spring Boot
    public class RetryExampleApplication {
      // ...
    }
    

    Adding retry handling with Annotations

    We are now ready to add retry handling to methods. To do so, we simply have to annotate the appropriate methods with @Retryable:

    @Service
    public class MyService {
    
      @Retryable
      public void simpleRetry() {
        // perform operation that is likely to fail
      }
    }	

    Methods annotated with @Retryable can be called like any other methods. However, whenever the execution of a retryable method fails with an exception, Spring will automatically retry to call the method up to three times. By default Spring uses a 1 second delay between method calls. Please note that the calling thread blocks during retry handling.

    The retry behavior can be customized in various ways. For example:

    @Service
    public class MyService {
    
      @Retryable(value = {FooException.class, BarException.class}, maxAttempts = 5)
      public void retryWithException() {
        // perform operation that is likely to fail
      }
    
      @Recover
      public void recover(FooException exception) {
        // recover from FooException
      }
    }
    

    Here we tell Spring to apply retry handling only if a Exception of type FooException or BarException is thrown. Other exceptions will not cause a retry. maxAttempts = 5 tells Spring to retry the method up to 5 times if it fails.

    With @Recover we define a separate recovery method for FooException. This allows us to run special recovery code when a retryable method fails with FooException.

    Adding retry handling with RetryTemplate

    Besides annotations Spring Retry offers a RetryTemplate that can be used to define retry handling in Java code. Like any other bean, a RetryTemplate can simply be configured in our configuration class:

    @EnableRetry
    @SpringBootApplication // or @Configuration if you are not using Spring Boot
    public class RetryExampleApplication {
    
      @Bean
      public RetryTemplate retryTemplate() {
        SimpleRetryPolicy retryPolicy = new SimpleRetryPolicy();
        retryPolicy.setMaxAttempts(5);
    
        FixedBackOffPolicy backOffPolicy = new FixedBackOffPolicy();
        backOffPolicy.setBackOffPeriod(1500); // 1.5 seconds
    
        RetryTemplate template = new RetryTemplate();
        template.setRetryPolicy(retryPolicy);
        template.setBackOffPolicy(backOffPolicy);
    
        return template;
      }
      
      // ...
    }

    A RetryPolicy determines when an operation should be retried. SimpleRetryPolicy is a RetryPolicy implementation that retries a fixed number of times.

    A BackOffPolicy is a strategy interface to control back off between retry attempts. A FixedBackOffPolicy pauses for a fixed period of time before continuing. Some other default BackOffPolicy implementations are ExponentialBackOffPolicy (increases the back off period for each retry) or NoBackOffPolicy (no delay between retries).

    We can now inject the RetryTemplate to our service. To run code with retry handling we simply have to call RetryTemplate.execute():

    @Service
    public class RetryService {
    
      @Autowired
      private RetryTemplate retryTemplate;
    
      public void withTemplate() {
        retryTemplate.execute(context -> {
          // perform operation that is likely to fail
        });
      }
    
      // ...
    }
    

    RetryTemplate.exeucte() takes a RetryCallback<T, E> as parameter. RetryCallback is a functional interface so it can be implemented using a Java 8 Lambda expression (as shown above).

    Summary

    Spring retry provides an easy way to add retry handling to spring applications. Retry handling can be added using either annotations (@Retryable and @Recover) or by passing a RetryCallback to a RetryTemplate.

    You can find the full example source code on GitHub.

  • Tuesday, 15 March, 2016

    Java EE 8 MVC: Working with bean parameters

    In the last posts we saw how to access query, path and form parameters in MVC Controllers. This post shows how multiple parameters can be mapped to an object using the @BeanParam annotation.

    Let's reuse the simple HTML form from the post about form parameters:

    <form action="submit" method="post">
      <label>ID:</label>
      <input type="text" name="id" />
    
      <label>Name:</label>
      <input type="text" name="name" />
    
      <label>Role:</label>
      <select name="role">
    	<option value="admin">Admin</option>
    	<option value="reporter">Reporter</option>
    	<option value="accountant">Accountant</option>
      </select>
    
      <input type="submit"/>
    </form>

    This defines a simple form containing two text input fields and a select menu with three options.

    In the previous post about form parameters, we learned that we can access these parameters by annotating controller parameters with @FormParam.

    However, this approach is cumbersome if the form has more than a few parameters. In these situations we typically want to map form parameters to a separate object. @BeanParams helps us with doing exactly this.

    With @BeanParam we can write:

    @POST
    @Path("submit")
    @Controller
    public String submit(@BeanParam User user) {
      // use user ..
    }

    The User class looks like this:

    public class User {
    
      @FormParam("id")
      private long id;
    
      @FormParam("name")
      private String name;
    
      @FormParam("role")
      private Role role;
     
      // getters and setters
    }


    When the controller method is called a new instance of User will automatically be created. The fields of the created object will be filled with the passed form parameters.

    @BeanParam and other parameter annotations

    Classes used with @BeanParam are not limited to form parameters. All parameter annotations shown in previous blog posts (@QueryParam, @PathParam, etc.) can be used inside bean parameters.

    For example:

    @GET
    @Path("/date/{year}/{month}")
    public String get(@BeanParam RequestData data) {
      ...
    }
    
    public class RequestData {
    
      @PathParam("year")
      private int year;
    
      @PathParam("month")
      private int month;
    
      @QueryParam("name")
      private String name;
    
      // getters and setters
    }
    

    If we now send a HTTP GET request to

    /date/2016/02?name=john

    the values 2016, 2 and john will be injected to the fields year, month and name of RequestData.

    Quick Summary

    With @BeanParam you can inject request parameters into beans. This is especially useful if you have more than a few parameters. Inside bean parameters all other parameter annotations can be used.

    You can find the example source code on GitHub.

  • Monday, 29 February, 2016

    Converting Markdown to PDF or DOCX with Pandoc

    Markdown is a popular text formatting syntax among developers these days. Popular Sites like Github or Bitbucket use Markdown for project documentation and various other types of user generated content. These sites automatically convert markdown syntax to HTML, so it can be displayed in a browser.

    However, maybe you want to use Markdown as document format without using a platform that does the conversion for you. Or you are in need of an output format other than HTML. In this case you need a tool that can convert markdown to the desired target format. Pandoc is is a document conversion tool that can be used for exactly this (and a lot of other things). With Pandoc you can convert Markdown documents to PDF, HTML, Words DOCX or many other formats.

    After installing Pandoc, you can simply run it from command line.

    Note: By default, Pandoc uses LaTeX to generate PDF documents. So, if you want to generate PDF documents, you need to install a LaTex processor first (list of required LaTeX packages).

    To convert a doc.md Markdown file into a PDF document, the following command can be used:

    pandoc -s -o doc.pdf doc.md

    Pandoc is able to merge multiple Markdown files into a single PDF document. To generate a single PDF document out of two Markdown files you can use:

    pandoc -s -o doc.pdf part01.md part02.md

    By default the page margins in the resulting PDF document are quite large. You can change this by passing a margin parameter:

    pandoc -s -V geometry:margin=1in -o documentation.pdf part01.md part02.md

    To create HTML or DOCX documents you simply have to change the file extension of the target file:

    pandoc -s -o doc.html part01.md part02.md
    pandoc -s -o doc.docx part01.md part02.md
    

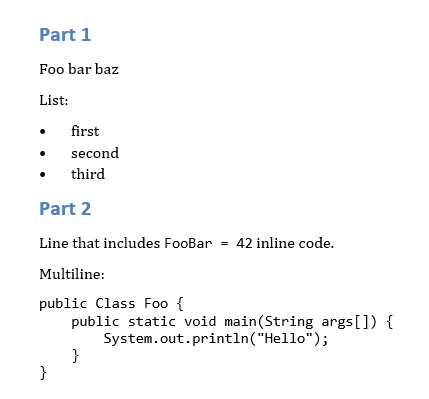
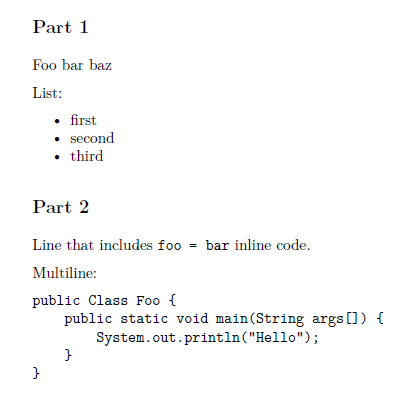
    The resulting documents are well formatted. The following two screenshot show a DOCX and a PDF document created out of two small example markdown files:

    Resulting DOCX document:

    Word docx document generated by Pandoc

    Resulting PDF document:

    Pdf document generated by Pandoc