mscharhag, Programming and Stuff;

A blog about programming and software development topics, mostly focused on Java technologies including Java EE, Spring and Grails.

  • Wednesday, 11 December, 2019

    Collecting application metrics with Micrometer

    What is Micrometer?

    Micrometer is a simple facade for collecting metrics inside Java applications in a vendor neutral way. You can think of SLF4J for metrics. Micrometer has built-in support for many different metrics backends, including Atlas, Datadog, Elastic, JMX and much more. In this post we will see how we can collect metrics with Micrometer in Java applications.

    Micrometer dependencies

    First we need to add the micrometer dependency to our project. Note that you need to choose the correct dependency based on the metrics backend you want to use.

    Here we choose JMX, so we need the micrometer-registry-jmx artifact.

    <dependency>
        <groupId>io.micrometer</groupId>
        <artifactId>micrometer-registry-jmx</artifactId>
        <version>1.2.0</version>
    </dependency>
    

    For example: If you want to use Elasticsearch instead of JMX, you need to add micrometer-registry-elastic.

    Creating a MeterRegistry

    Before we can start collecting metrics we need to create a MeterRegistry. The MeterRegistry is used to create Meters which then collect the actual metrics.

    MeterRegistry is an interface with different implementations, based on the metrics backend you want to use. The simplest MeterRegistry implementation is SimpleMeterRegistry that does not export the data anywhere. It simply holds the latest value of each meter in memory.

    MeterRegistry registry = new SimpleMeterRegistry();
    

    If we instead want to export metric data to JMX, we need to create a JmxMeterRegistry.

    MeterRegistry registry = new JmxMeterRegistry(new JmxConfig() {
        @Override
        public String get(String s) {
            return null;
        }
    }, Clock.SYSTEM);
    

    The get() method of the passed JmxConfig instance can be used to provide additional configuration values. We do not need this feature in our simple example, so we simply return null.

    If we want to export our metrics to multiple monitoring backends, we can use a CompositeMeterRegistry. A CompositeMeterRegistry passes the data to one or more other registries, allowing you to publish metrics to more than one metrics backend.

    For example:

    CompositeMeterRegistry registry = new CompositeMeterRegistry();
    registry.add(new JmxMeterRegistry(..));
    registry.add(new ElasticMeterRegistry(..));
    

    Meters

    Meter is the micrometer interface for collecting metrics. Example implementations of Meter are Counter, Timer and Gauge.

    Creating a Counter

    We can create a Counter using a simple builder API:

    Counter counter = Counter
            .builder("my.counter")
            .description("counts something important")
            .tag("environment", "test")
            .tag("region", "us-east")
            .register(registry);
    

    This creates a Counter named my.counter and adds it to the MeterRegistry named registry. We can also add one or more tags and an optional description to our Counter. Meters are typically created once and then used multiple times.

    To increase the counter value we can call the increment() method:

    counter.increment(); // increment by one
    counter.increment(2.5);
    

    Creating a Timer

    A Timer can be created in a similar way:

    Timer timer = Timer.builder("my.timer").register(registry);
    

    Here we skipped the optional parameters like tags or description.

    We can now add timing metrics to our timer using the record() method:

    // recording execution time of code
    timer.record(() -> {
        // do something 
    });
    
    // record a precomputed value
    timer.record(Duration.ofMillis(123));


    Viewing Results in JConsole

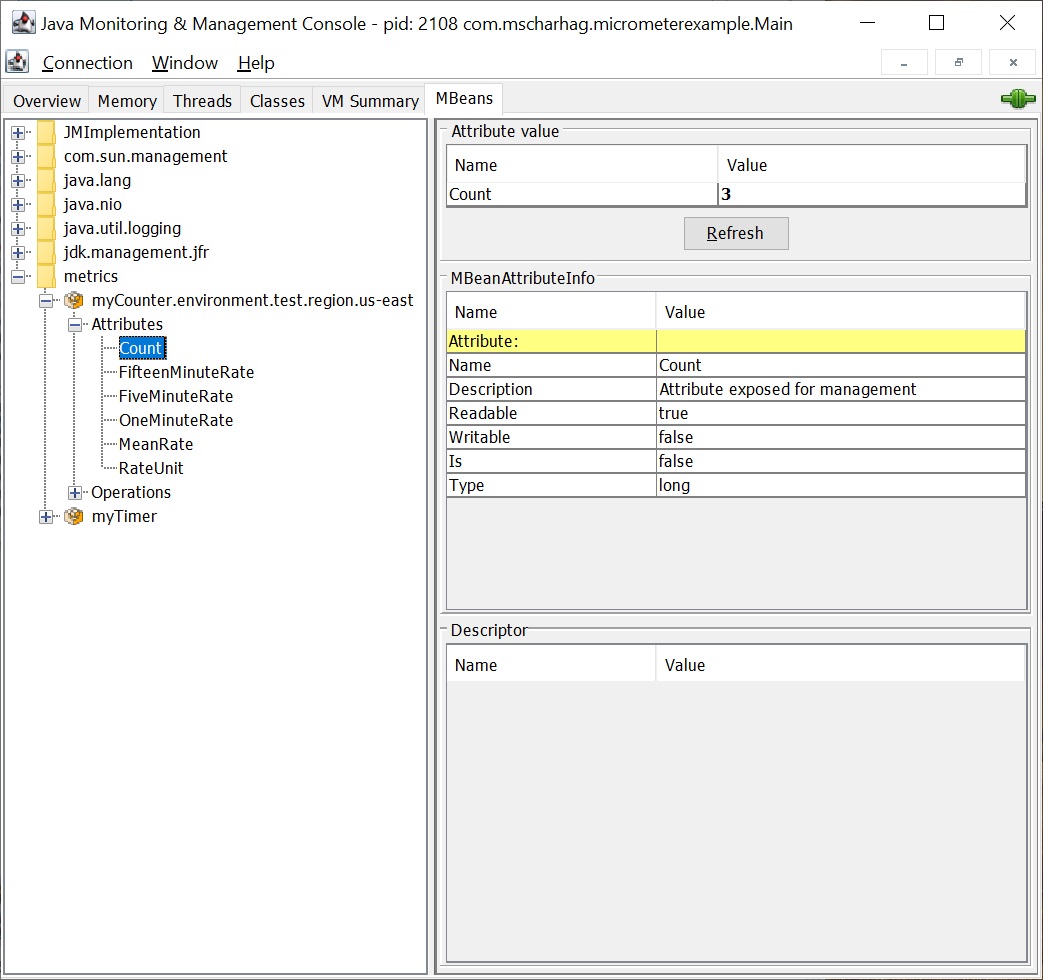
    Since we are using a JmxMeterRegistry our metric information can be accessed via JMX. For this we can use JConsole which can be started by executing jconsole in your <jdk>/bin directory. After connecting to your Java application process you can find the current application metrics within the MBeans tab:

    micrometer jmx metrics

    Of course you have to use a different tool to view the metrics if you use a different MetricsRegistry. For example you can use Kibana if you are using an ElasticMeterRegistry.

    Summary

    Micrometer provides an easy to use facade that can be used in Java applications for collecting application metrics. These metric information can be then exported to many different backend technologies (including Elasticsearch and JMX). You can find the source code for the examples on GitHub.

  • Monday, 28 May, 2018

    Java EE MVC: Handling form validation

    In this post we will have a look on form validation in Java EE MVC.

    Java EE MVC integrates with the Java Bean Validation API (JSR 303) which makes adding validation constraints pretty easy.

    Validation using the JAX-RS way

    Assume we have a small html form that can be used to send contact messages. To represent the form data we create a small ContactMessage bean containing the form fields and validation constraints:

    public class ContactMessage {
    
        @FormParam("message")
        @NotBlank
        @Size(max = 1000)
        private String message;
    
        // getters / setters
    }
    

    In our MVC controller we use the @BeanParam annotation to convert the form data to a ContactMessage object:

    @Controller
    @Path("/")
    public class ContactController {
    
        @POST
        public String formSubmit(@Valid @BeanParam ContactMessage message) {
            ...
        }
    }
    

    (For more details about the @BeanParam annotation, have a look at the blog post Working with bean parameters)

    By adding the @Valid annotation to the ContactMessage parameter we enable validation. If a form is submitted and the validation of the ContactMessage object fails, a ConstraintViolationException will be thrown. The controller method will not be called in this case. Instead, the exception can be handled using a generic JAX-RS ExceptionMapper like shown in another post: Global Exception handling in Java EE MVC.

    This approach is typically fine for standard JAX-RS REST endpoints. Here we often want to return a generic HTTP 400 (Bad request) status code if invalid data has been passed to the server.

    In an MVC environment we can use this behaviour to render a standard error page to the user, whenever invalid data has been passed. However, this is often not flexible enough. Often we want to return a more specific page that shows an error message to the user.

    Validation using @MvcBinding and BindingResult

    Java EE MVC provides a @MvcBinding annotation that enables an alternative exception handling mechanism. @MvcBinding can be placed on fields and method parameters together with JAX-RS binding annotations (like @FormParam):

    public class ContactMessage {
    
        @MvcBinding
        @FormParam("message")
        @NotBlank
        @Size(max = 1000)
        private String message;
    
        // getters / setters
    }


    This tells Java EE MVC to call the controller method instead of the generic exception handler if binding of the annotated field fails. To access binding information, we can inject a BindingResult object into our controller class:

    @Controller
    @Path("/")
    public class ContactController {
    
        @Inject
        private Models models;
    
        @Inject
        private BindingResult bindingResult;
    
        @POST
        public String formSubmit(@Valid @BeanParam ContactMessage message) {
            if (bindingResult.isFailed()) {
                models.put("bindingResult", bindingResult);
                return "/WEB-INF/jsp/contact.jsp";
            }
            return "/WEB-INF/jsp/success.jsp";
        }
    }
    

    As the name suggests, we can use the injected BindingResult object to access binding information within a controller method. In this example we simply check if there was a binding problem by calling isFailed(). By adding the bindingResult to the model, we can access it later in the view to show an error message to the user.

    A simple JSP view that displays all validation errors below the submit button looks like this:

    <form action="${mvc.contextPath}/contact" method="post">
        <label>Message:</label>
        <textarea name="message"></textarea>
        <br/>
    
        <input type="submit"/>
    
        <c:if test="${bindingResult.isFailed()}">
            <p>Form validation failed. Reasons:</p>
            <ul>
                <c:forEach items="${bindingResult.allValidationErrors}" var="validationError">
                    <li>
                        <c:out value="${validationError.paramName}: ${validationError.message}"/>
                    </li>
                </c:forEach>
            </ul>
        </c:if>
    </form>
    

    Conclusion

    Form validation is pretty easy with Java EE MVC. Validation constraints can be added to beans using JSR 303 Bean validation annotations. @MvcBinding allows us to handle validation errors within controller methods instead of using generic ExceptionMappers. BindingResult gives us access to validation information.

    As always you can find the example code on GitHub.

  • Monday, 21 May, 2018

    Using Java Stream summary statistics

    Streams of primitive types (IntStream, etc.) provide a summaryStatistics() method that can be used to get multiple statistical properties of a stream (minimum value, average value, etc.).

    Assume we have a list of people. Our goal is to get the minimum and maximum age of the people in the list using streams.

    The problem here is that the computation of the minimum and maximum values are terminal stream operations. So we need to come up with our own reduction implementation or create a new stream for every computation. A naive implementation might look like this:

    List<Person> list = Arrays.asList(
            new Person("John Blue", 28),
            new Person("Anna Brown", 53),
            new Person("Paul Black", 47)
    );
    
    int min = list.stream()
            .mapToInt(Person::getAge)
            .min()
            .orElseThrow(NoSuchElementException::new);
    
    int max = list.stream()
            .mapToInt(Person::getAge)
            .max()
            .orElseThrow(NoSuchElementException::new);
    

    Luckily Java provides a much simpler way to do this using the summaryStatistics() method:

    IntSummaryStatistics statistics = list.stream()
            .mapToInt(Person::getAge)
            .summaryStatistics();
    
    int min = statistics.getMin();
    int max = statistics.getMax();
    

    IntSummaryStatistics also provides methods to obtain the count and sum of the stream elements.

    You can find the full example code on GitHub.

  • Sunday, 13 May, 2018

    Templating with Rocker

    In this post we will have a quick look at Rocker, a statically typed and fast Java 8 template engine.

    Requireded Dependencies

    To get started with Rocker we need to add the following dependencies to our project:

    <dependency>
      <groupId>com.fizzed</groupId>
      <artifactId>rocker-runtime</artifactId>
      <version>0.24.0</version>
    </dependency>
    
    <!-- for hot-reloading support in development -->
    <dependency>
      <groupId>com.fizzed</groupId>
      <artifactId>rocker-compiler</artifactId>
      <version>0.24.0</version>
    </dependency>

    We also need the Rocker Maven plugin, which converts Rocker templates to Java code:

    <build>
      <plugins>
        <plugin>
          <groupId>com.fizzed</groupId>
          <artifactId>rocker-maven-plugin</artifactId>
          <version>0.24.0</version>
          <executions>
            <execution>
              <id>generate-rocker-templates</id>
              <phase>generate-sources</phase>
              <goals>
                <goal>generate</goal>
              </goals>
            </execution>
          </executions>
        </plugin>
      </plugins>
    </build>

    Creating the first templates

    We will start with a simple example containing two Rocker templates and a Java class.

    In the first template (main.rocker.html) we define the basic page structure:

    @args (String title, RockerBody content)
    
    <html>
      <head>
        <title>@title</title>
      </head>
      <body>
        @content
      </body>
    </html>

    This template has two parameters: The page title and a RockerBody element named content. The content parameter is basically a sub template that is added to the <body> tag.

    Now we create another template (basic.rocker.html) that defines the content that is passed to our first template:

    @args (String name)
    
    @views.main.template("Basic example") -> {
      <h1>Hello @name!</h1>
    }

    This template has a single name parameter that is written to a <h1> tag. We reference the first template (main.rocker.html) with @views.main and use the template(..) method to render it. "Basic example" will be passed as title parameter. The content parameter is defined within the curly braces.

    Rendering Rocker templates

    Rocker templates are converted to Java code. This can be done using the following Maven command:

    mvn generate-sources

    This generates a Java class for each template in the target/generated-sources/rocker directory.

    Now we can render our templates using Java code:

    public class Main {
    
      public static void main(String... args) throws Exception {
    
        // The template "basic.rocker.html" got converted to the class named "basic"
        // which is located in the "views" package
        
        String result = views.basic.template("John")
            .render()
            .toString();
    
        System.out.println(result);
      }
    }

    The output we get looks like this:

    <html>
      <head>
        <title>Basic example</title>
      </head>
      <body>
        <h1>Hello John!</h1>
      </body>
    </html>

    A bit of a problem with this approach is that you need to run mvn generate-sources everytime you make a change in your template files. Also note, that your Java code might not compile if the code generation fails because you have an issue in one of your templates.

    Another possible approach is to use hot reloading and reference the templates dynamically via file names.

    In this case the Java code looks like this:

    public class Main {
    
      public static void main(String... args) throws Exception {
    
        // Enable hot reloading
        RockerRuntime.getInstance().setReloading(true);
    
        // Reference via string instead of using generated code
        String result = Rocker.template("views/basic.rocker.html")
            .bind("name", "John")
            .render()
            .toString();
    
        System.out.println(result)
      }
    }

    The output we get is exactly the same.

    Expressions

    Assume we have a simple User class that contains the methods getFirstName() and getLastName(). In the following example we see how we can work with the User object in a Rocker template:

    @import com.mscharhag.rockerexample.*
    
    @args (User user)
    
    @views.main.template("Expressions") -> {
      <ul>
        <!-- first name -->
        <li>@user.getFirstName()</li>
    
        <!-- first three letters of first name -->
        <li>@user.getFirstName().substring(0, 3)</li>
    
        <!-- first name and last name -->
        <li>@user.getFirstName() @user.getLastName()</li>
    
        <!-- using a variable-->
        @name => {
          @user.getFirstName() @user.getLastName()
        }
        <li>@name</li>
    
      </ul>
    }

    Conditions

    Rocker supports the standard Java if-else flow structure as the following example shows:

    @import com.mscharhag.rockerexample.*
    
    @args (User user)
    
    @views.main.template("Conditions") -> {
      @if (user.getFirstName().length() > 10) {
        <p>Long first name</p>
      } else {
        <p>short first name</p>
      }
    }

    Loops

    Rocker templates support different forms of loops:

    @import com.mscharhag.rockerexample.*
    @import java.util.*
    
    @args (List<User> users)
    
    @views.main.template("Loops") -> {
      <ul>
        <!-- standard for loop -->
        @for (int i = 0; i < users.size(); i++) {
          <li>@users.get(i).getFirstName()</li>
        }
      
        <!-- standard 'for each' loop -->
        @for (User user : users) {
          <li>@user.getFirstName()</li>
        }
      
        <!-- for each loop with additional loop information
      
          <li>0: John, first: true, last: false</li>
          <li>1: Martin, first: false, last: false</li>
          <li>2: Anna, first: false, last: true</li>
        -->
        @for ((i, user) : users) {
          <li>@i.index(): @user.getFirstName(), first: @i.first(), last: @i.last()</li>
        }
      
      </ul>
    }

    The last loop is a special variation of Java's for-each loop. A second index parameter (named i in the example) can be used to access current iteration information.

    Conclusion

    Rocker can be definitively an option if you are looking for a Java template engine. According to the benchmark on the Rocker GitHub repository Rocker is a lot faster than other Java template engines like Freemarker or Velocity. The comprehensive documentation is another good point to mention.

    The fact that Rocker compiles to Java and allows you to pass data to views in a typesafe way is quite interesting. On one side this is useful because it helps to reduce bugs. On the other side the same feature annoyed me a bit, while I was writing the examples. Whenever I made code changes that affected Rocker templates (e.g. by changing the name of a method that was called within a Rocker template) the templates stopped compiling. In some situations this again stopped my Java code from compiling (because it was using the classes generated by Rocker). This is expected but it can break my preferred workflow of writing Java code first and fixing the templates later. Referencing templates via file names instead of using the generated classes solved this problem (but also throws away the type checking at compile time).

    You can find the code for the posted examples on GitHub.

  • Sunday, 5 March, 2017

    Be aware that bcrypt has a maximum password length

    bcrypt is a popular password hashing function these days. Other than standard hash functions (like SHA-515), bcrypt is designed to be slow and therefore very resistant to brute force attacks.

    However, when using bcrypt you should be aware that it limits your maximum password length to 50-72 bytes. The exact length depends on the bcrypt implementation you are using (see this stackexchange answer).

    Passwords that exceed the maximum length will be truncated.

    The following piece of code shows the password truncation using Spring Securities BCryptPasswordEncoder:

    BCryptPasswordEncoder passwordEncoder = new BCryptPasswordEncoder();
    
    // 72 characters
    String password1 = "aaaaaaaaaaaaaaaaaaaaaaaaaaaaaaaaaaaaaaaaaaaaaaaaaaaaaaaaaaaaaaaaaaaaaaaa";
    
    // 73 characters
    String password2 = "aaaaaaaaaaaaaaaaaaaaaaaaaaaaaaaaaaaaaaaaaaaaaaaaaaaaaaaaaaaaaaaaaaaaaaaab";
    
    String encodedPassword1 = passwordEncoder.encode(password1);
    boolean matches = passwordEncoder.matches(password2, encodedPassword1);
    
    System.out.println("encodedPassword1: " + encodedPassword1);
    System.out.println("matches: " + matches);
    

    When running this example, the output might look like this:

    encodedPassword1: $2a$10$A5OpVKgjEZzmy6UNsqzkjuG2xGET1wp3b/9ET5dz/tHQ3eRvyXSSO
    matches: true
    

    According to BCryptPasswordEncoder both passwords match (= are identical) even if they have a different length.