mscharhag, Programming and Stuff;

A blog about programming and software development topics, mostly focused on Java technologies including Java EE, Spring and Grails.

  • Tuesday, 2 February, 2021

    Validation in Spring Boot applications

    Validation in Spring Boot applications can be done in many different ways. Depending on your requirements some ways might fit better to your application than others. In this post we will explore the usual options to validate data in Spring Boot applications.

    Validation is done by using the Bean Validation API. The reference implementation for the Bean Validation API is Hibernate Validator.

    All required dependencies are packaged in the Spring Boot starter POM spring-boot-starter-validation. So usually all you need to get started is the following dependency:

    <dependency>
        <groupId>org.springframework.boot</groupId>
        <artifactId>spring-boot-starter-validation</artifactId>
    </dependency>
    

    Validation constraints are defined by annotating fields with appropriate Bean Validation annotations. For example:

    public class Address {
    
        @NotBlank
        @Size(max = 50)
        private String street;
    
        @NotBlank
        @Size(max = 50)
        private String city;
    
        @NotBlank
        @Size(max = 10)
        private String zipCode;
        
        @NotBlank
        @Size(max = 3)
        private String countryCOde;
    
        // getters + setters
    }

    I think these annotations are quite self-explanatory. We will use this Address class in many of the following examples.

    You can find a complete list of build in constraint annotations in the Bean Validation documentation. Of course you can also define you own validation constraints by creating a custom ConstraintValidator.

    Defining validation constraints is only one part. Next we need to trigger the actual validation. This can be done by Spring or by manually invoking a Validator. We will see both approaches in the next sections.

    Validating incoming request data

    When building a REST API with Spring Boot it is likely you want to validate incoming request data. This can be done by simply adding the @Valid Annotation to the @RequestBody method parameter. For example:

    @RestController
    public class AddressController {
    
        @PostMapping("/address")
        public void createAddress(@Valid @RequestBody Address address) {
            // ..
        }
    }

    Spring now automatically validates the passed Address object based on the previously defined constraints.

    This type of validation is usually used to make sure the data sent by the client is syntactically correct. If the validation fails the controller method is not called and a HTTP 400 (Bad request) response is returned to the client. More complex business specific validation constraints should typically be checked later in the business layer.

    Persistence layer validation

    When using a relational database in your Spring Boot application, it is likely that you are also using Spring Data and Hibernate. Hibernate comes with supports for Bean Validation. If your entities contain Bean Validation annotations, those are automatically checked when persisting an entity.

    Note that the persistence layer should definitely not be the only location for validation. If validation fails here, it usually means that some sort of validation is missing in other application components. Persistence layer validation should be seen as the last line of defense. In addition to that, the persistence layer is usually too late for business related validation.

    Method parameter validation

    Another option is the method parameter validation provided by Spring. This allows us to add Bean Validation annotations to method parameters. Spring then uses an AOP interceptor to validate the parameters before the actual method is called.

    For example:

    @Service
    @Validated
    public class CustomerService {
    
        public void updateAddress(
                @Pattern(regexp = "\\w{2}\\d{8}") String customerId,
                @Valid Address newAddress
        ) {
            // ..
        }
    }

    This approach can be useful to validate data coming into your service layer. However, before committing to this approach you should be aware of its limitations as this type of validation only works if Spring proxies are involved. See my separate post about Method parameter validation for more details.

    Note that this approach can make unit testing harder. In order to test validation constraints in your services you now have to bootstrap a Spring application context.

    Triggering Bean Validation programmatically

    In the previous validation solutions the actual validation is triggered by Spring or Hibernate. However, it can be quite viable to trigger validation manually. This gives us great flexibility in integrating validation into the appropriate location of our application.

    We start by creating a ValidationFacade bean:

    @Component
    public class ValidationFacade {
    
        private final Validator validator;
    
        public ValidationFacade(Validator validator) {
            this.validator = validator;
        }
    
        public <T> void validate(T object, Class<?>... groups) {
            Set<ConstraintViolation<T>> violations = validator.validate(object, groups);
            if (!violations.isEmpty()) {
                throw new ConstraintViolationException(violations);
            }
        }
    }

    This bean accepts a Validator as constructor parameter. Validator is part of the Bean Validation API and responsible for validating Java objects. An instance of Validator is automatically provided by Spring, so it can be injected into our ValidationFacade.

    Within the validate(..) method we use the Validator to validate a passed object. The result is a Set of ConstraintViolations. If no validation constraints are violated (= the object is valid) the Set is empty. Otherwise, we throw a ConstraintViolationException.

    We can now inject our ValidationFacade into other beans. For example:

    @Service
    public class CustomerService {
    
        private final ValidationFacade validationFacade;
    
        public CustomerService(ValidationFacade validationFacade) {
            this.validationFacade = validationFacade;
        }
    
        public void updateAddress(String customerId, Address newAddress) {
            validationFacade.validate(newAddress);
            // ...
        }
    }

    To validate an object (here newAddress) we simply have to call the validate(..) method of ValidationFacade. Of course we could also inject the Validator directly in our CustomerService. However, in case of validation errors we usually do not want to deal with the returned Set of ConstraintViolations. Instead it is likely we simply want to throw an exception, which is exactly what ValidationFacade is doing.

    Often this is a good approach for validation in the service/business layer. It is not limited to method parameters and can be used with different types of objects. For example, we can load an object from the database, modify it and then validate it before we continue.

    This way is also quite good to unit test as we can simply mock ValidationFacade. In case we want real validation in unit tests, the required Validator instance can be created manually (as shown in the next section). Both cases do not require to bootstrap a Spring application context in our tests.

    Validating inside business classes

    Another approach is to move validation inside your actual business classes. When doing Domain Driven Design this can be a good fit. For example, when creating an Address instance the constructor can make sure we are not able to construct an invalid object:

    public class Address {
    
        @NotBlank
        @Size(max = 50)
        private String street;
    
        @NotBlank
        @Size(max = 50)
        private String city;
    
        ...
        
        public Address(String street, String city) {
            this.street = street;
            this.city = city;
            ValidationHelper.validate(this);
        }
    }

    Here the constructor calls a static validate(..) method to validate the object state. This static validate(..) methods looks similar to the previously shown method in ValidationFacade:

    public class ValidationHelper {
    
        private static final Validator validator = Validation.buildDefaultValidatorFactory().getValidator();
    
        public static <T> void validate(T object, Class<?>... groups) {
            Set<ConstraintViolation<T>> violations = validator.validate(object, groups);
            if (!violations.isEmpty()) {
                throw new ConstraintViolationException(violations);
            }
        }
    }

    The difference here is that we do not retrieve the Validator instance by Spring. Instead, we create it manually by using:

    Validation.buildDefaultValidatorFactory().getValidator()

    This way we can integrate validation directly into domain objects without relying on someone outside to validate the object.

    Summary

    We saw different ways to deal with validation in Spring Boot applications. Validating incoming request data is good to reject nonsense as early as possible. Persistence layer validation should only be used as additional layer of safety. Method validation can be quite useful, but make sure you understand the limitations. Even if triggering Bean Validation programmatically takes a bit more effort, it is usually the most flexible way.

    You can find the source code for the shown examples on GitHub.

  • Sunday, 17 January, 2021

    REST: Partial updates with PATCH

    In previous posts we learned how to update/replace resources using the HTTP PUT operation. We also learned about the differences between POST, PUT and PATCH. In this post we will now see how to perform partial updates with the HTTP PATCH method.

    Before we start, let's quickly check why partial updates can be useful:

    • Simplicity - If a client only wants to update a single field, a partial update request can be simpler to implement.
    • Bandwidth - If your resource representations are quite large, partial updates can reduce the amount of bandwidth required.
    • Lost updates - Resource replacements with PUT can be susceptible for the lost update problem. While partial updates do not solve this problem, they can help reducing the number of possible conflicts.

    The PATCH HTTP method

    Other like PUT or POST the PATCH method is not part of the original HTTP RFC. It has later been added via RFC 5789. The PATCH method is neither safe nor idempotent. However, PATCH it is often used in an idempotent way.

    A PATCH request can contain one or more requested changes to a resource. If more than one change is requested the server must ensure that all changes are applied atomically. The RFC says:

    The server MUST apply the entire set of changes atomically and never provide ([..]) a partially modified representation. If the entire patch document cannot be successfully applied, then the server MUST NOT apply any of the changes.

    The request body for PATCH is quite flexible. The RFC only says the request body has to contain instructions on how the resource should be modified:

    With PATCH, [..], the enclosed entity contains a set of instructions describing how a resource currently residing on the origin server should be modified to produce a new version.  

    This means we do not have to use the same resource representation for PATCH requests as we might use for PUT or GET requests. We can use a completely different Media-Type to describe the resource changes.

    PATCH can be used in two common ways which both have their own pros and cons. We will look into both of them in the next sections.

    Using the standard resource representation to send changes (JSON Merge Patch)

    The most intuitive way to use PATCH is to keep the standard resource representation that is used in GET or PUT requests. However, with PATCH we only include the fields that should be changed.

    Assume we have a simple product resource. The response of a simple GET request might look like this:

    GET /products/123
    
    {
        "name": "Cool Gadget",
        "description": "It looks very cool",
        "price": 4.50,
        "dimension": {
            "width": 1.3,
            "height": 2.52,
            "depth": 0.9
        }
        "tags": ["cool", "cheap", "gadget"]
    }

    Now we want to increase the price, remove the cheap tag and update the product width. To accomplish this, we can use the following PATCH request:

    PATCH /products/123
    {
        "price": 6.20,
        "dimension": {
            "width": 1.35
        }
        "tags": ["cool", "gadget"]
    }

    Fields not included in the request should stay unmodified. In order to remove an element from the tags array we have to include all remaining array elements.

    This usage of PATCH is called JSON Merge Patch and is defined in RFC 7396. You can think of a PUT request that only uses a subset of fields. Patching this way makes PATCH requests usually idempotent.

    JSON Merge Patch and null values

    There is one caveat with JSON Merge Patch you should be aware of: The processing of null values.

    Assume we want to remove the description of the previously used product resource. The PATCH request looks like this:

    PATCH /products/123
    {
        "description": null
    }

    To fulfill the client's intent the server has to differentiate between the following situations:

    • The description field is not part of the JSON document. In this case, the description should stay unmodified.
    • The description field is part of the JSON document and has the value null. Here, the server should remove the current description.

    Be aware of this differentiation when using JSON libraries that map JSON documents to objects. In strongly typed programming languages like Java it is likely that both cases produce the same result when mapped to a strongly typed object (the description field might result in being null in both cases).

    So, when supporting null values, you should make sure you can handle both situations.

    Using a separate Patch format

    As mentioned earlier it is fine to use a different media type for PATCH requests.

    Again we want to increase the price, remove the cheap tag and update the product width. A different way to accomplish this, might look like this:

    PATCH /products/123
    {
        "$.price": {
            "action": "replace",
            "newValue": 6.20
        },
        "$.dimension.width": {        
            "action": "replace",
            "newValue": 1.35
        },
        "$.tags[?(@ == 'cheap')]": {
            "action": "remove"
        }
    }

    Here we use JSONPath expressions to select the values we want to change. For each selected value we then use a small JSON object to describe the desired action.

    To replace simple values this format is quite verbose. However, it also has some advantages, especially when working with arrays. As shown in the example we can remove an array element without sending all remaining array elements. This can be useful when working with large arrays.

    JSON Patch

    A standardized media type to describe changes using JSON is JSON Patch (described in RFC 6902). With JSON Patch our request looks this:

    PATCH /products/123
    Content-Type: application/json-patch+json
    
    [
        { 
            "op": "replace", 
            "path": "/price", 
            "value": 6.20
        },
        {
            "op": "replace",
            "path": "/dimension/width",
            "value": 1.35
        },
        {
            "op": "remove", 
            "path": "/tags/1"
        }
    ]

    This looks a bit similar to our previous solution. JSON Patch uses the op element to describe the desired action. The path element contains a JSON Pointer (yet another RFC) to select the element to which the change should be applied.

    Note that the current version of JSON Patch does not support removing an array element by value. Instead, we have to remove the element using the array index. With /tags/1 we can select the second array element.

    Before using JSON Patch, you should evaluate if it fulfills your needs and if you are fine with its limitations. In the issues of the GitHub repository json-patch2 you can find a discussion about a possible revision of JSON Patch.

    If you are using XML instead of JSON you should have a look at XML Patch (RFC 5261) which works similar, but uses XML.

    The Accept-Patch header

    The RFC for HTTP PATCH also defines a new response header for HTTP OPTIONS requests: Accept-Patch. With Accept-Patch the server can communicate which media types are supported by the PATCH operation for a given resource. The RFC says:

    Accept-Patch SHOULD appear in the OPTIONS response for any resource that supports the use of the PATCH method.

    An example HTTP OPTIONS request/response for a resource that supports the PATCH method and uses JSON Patch might look like this:

    Request:

    OPTIONS /products/123

    Response:

    HTTP/1.1 200 OK
    Allow: GET, PUT, POST, OPTIONS, HEAD, DELETE, PATCH
    Accept-Patch: application/json-patch+json

    Responses to HTTP PATCH operations

    The PATCH RFC does not mandate how the response body of a PATCH operation should look. It is fine to return the updated resource. It is also fine to leave the response body empty.

    The server responds to HTTP PATCH requests usually with one of the following HTTP status codes:

    • 204 (No Content) - Indicates that the operation has been completed successfully and no data is returned
    • 200 (Ok) - The operation has been completed successfully and the response body contains more information (for example the updated resource).
    • 400 (Bad request) - The request body is malformed and cannot be processed.
    • 409 (Conflict) - The request is syntactically valid but cannot be applied to the resource. For example it can be used with JSON Patch if the element selected by a JSON pointer (the path field) does not exist.

    Summary

    The PATCH operation is quite flexible and can be used in different ways. JSON Merge Patch uses standard resource representations to perform partial updates. JSON Patch however uses a separate PATCH format to describe the desired changes. it also fine to come up with a custom PATCH format. Resources that support the PATCH operation should return the Accept-Patch header for OPTIONS requests.


  • Tuesday, 1 December, 2020

    HATEOAS without links

    Yes, I know this title sounds stupid, but could not find something that fits better. So let me explain why I think that links in HATEOAS APIs are not always that useful.

    If you don't know what HATEOAS is, I recommend reading my Introduction to Hypermedia REST APIs first.

    REST APIs with HATEOAS support provide two main features for decoupling client and server:

    1. Hypermedia avoids that the client needs to hard-code and construct URIs. This helps the server to evolve the REST-API in the future.
    2. The availability of links tells the client which operations can be performed on a resource. This avoids that server logic needs to be duplicated on the client.
      For example, assume the client needs to decide if a payment button should be displayed next to an order. The logic for this might be:
      if (order.status == OPEN and order.paymentDate == null) {
          show payment button
      }
      With HATEOAS the client needs not to know this logic. The check simply becomes:
      if (order.links.getByRel("payment") != null) {
          show payment button
      }
      The server can now change the rule that decides when an order can be paid without requiring a client update.


    How useful these features are depends on your application, your system architecture and your clients.

    The second point might not be a big deal for applications that mostly use CRUD operations. However, it can be very useful if your REST API is serving a more complex domain.

    The first point depends on your clients and to a certain degree on your overall system architecture. If you provide an API for public clients it is very likely that at least some clients will hard-code request URIs and not use the links you provide. In this case, you loose the ability to evolve your API without breaking (at least some) clients.

    If your clients do not use your API responses directly and instead expose their own API it is also unlikely that they will follow the links you return. For example, this can easily happen when using the Backend for Frontend pattern.

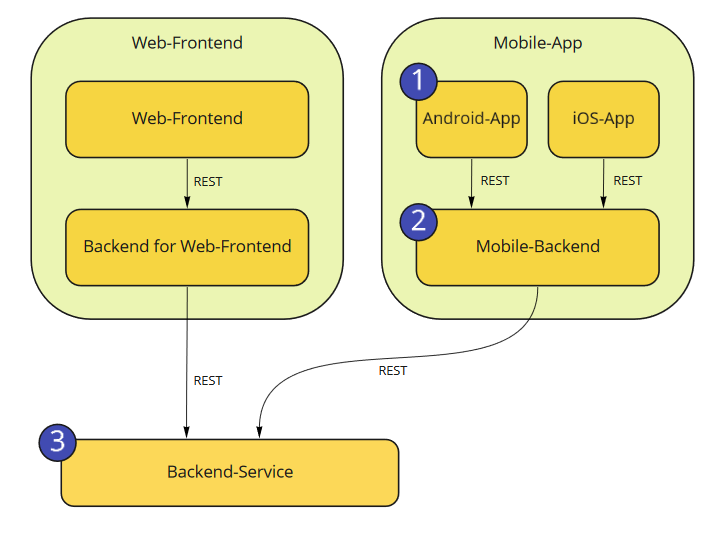
    Consider the following example system architecture:

    bff-system-architecture

    A Backend Service is used by two other systems. Both systems provide user-interfaces which communicate with system specific backends. REST is used for all communication.

    Assume a user performs an action using the Android-App (1). The App sends a request to the Mobile-Backend (2). Then, the Mobile-Backend might communicate with the Backend-Service (3) to perform the requested action. The Mobile-Backend can also pre-process, map or aggregate data retrieved from the Backend-Service before sending a response back to the Anroid-App.

    Now back to HATEOAS.

    If the Backend-Service (3) in this example architecture provides a Hypermedia REST API, clients can barely make use of HATEOAS related links.

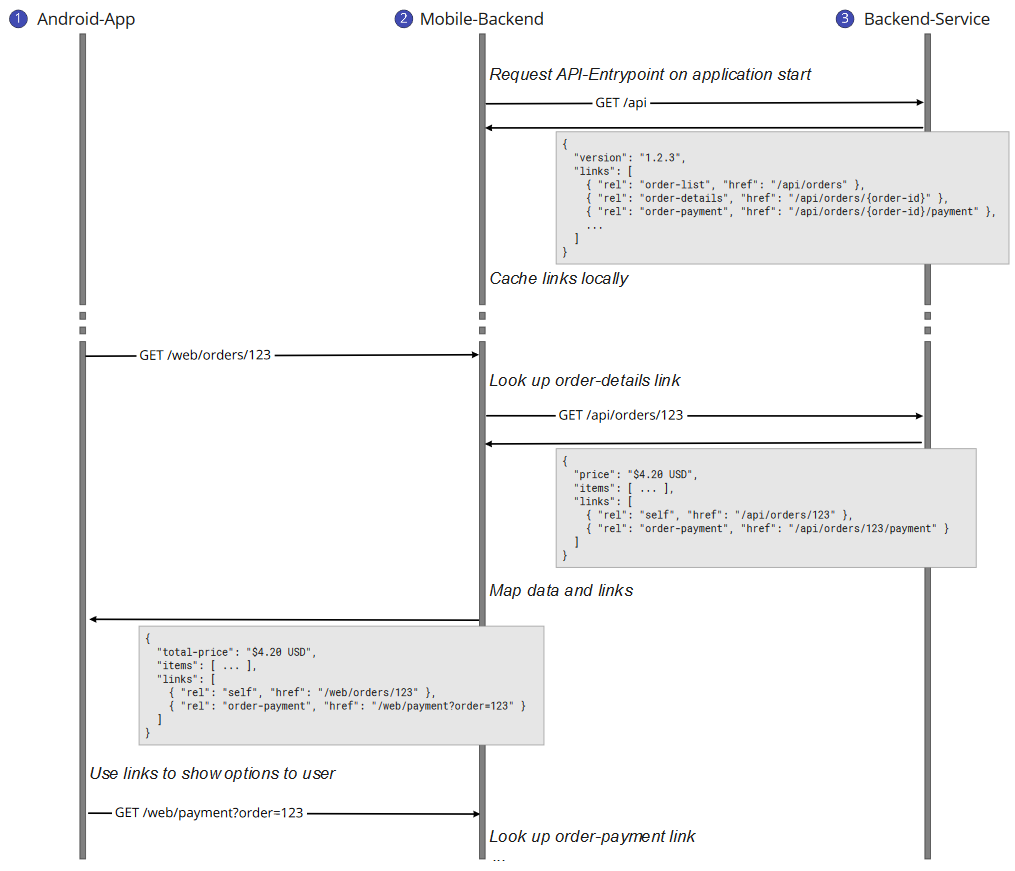
    Let's look at a sequence diagram showing the system communication to see the problem:

    bff-communication-example

    The Backend-Service (3) provides an API-Entrypoint which returns a list of all available operations with their request URIs. The Mobile-Backend (2) sends a request to this API-Entrypoint in regular intervals and caches the link list locally.

    Now assume a user of the Android-App (1) wants to access a specific order. To retrieve the required information the Anroid-App sends a request to the Mobile-Backend (2). The URI for this request might have been retrieved from the Mobile-Backends API-Entrypoint previously (not shown).

    To retrieve the requested order from the Backend-Service the Mobile-Backend uses the order-details link from the cached link list. The Backend-Service returns a response with HATEOAS links. Here, the order-payment link indicates that the order can be paid. The Mobile-Backend now transforms the response to its own return format and sends it back to the Android-App.

    The Mobile-Backend might also return a HATEOAS response. So link URIs from the Backend-Service need to be mapped to the appropriate Mobile-Backend URIs. Therefore the Mobile-Backend checks if an order-payment link is present in the Backend-Service response. If this is the case it adds an order-payment link to its own response.

    Note the Mobile-Backend is only using the relations (rel fields) of the Backend-Service response. The URIs are discarded.

    Now the user wants to pay the order. The Android-App uses the previously retrieved order-payment link to send a request to the Mobile-Backend. The Mobile-Backend now has lost the Context of the previous Backend-Service response. So it has to look up the order-payment link in the cached link list. The process continues in the same way as the previous request

    In this example the Android-App is able to make use of HATEOAS related links. However, the Mobile-Backend cannot use the link URIs returned by Backend-Service responses (except for the API entry-point). If the Mobile-Backend is providing HATEOAS features the link relations from the Backend-Service might be useful. The URIs for Backend-Service requests are always looked up from the cached API-Entrypoint response.

    Communicate actions instead of links

    Unfortunately link construction is not always that simple and can take some extra time. This time is wasted if you know that your clients won't use these links.

    Probably the easiest way to avoid logic duplication on the client is to ignore links and use a simple actions array in REST responses:

    GET /orders/123
    {
        "id": 123,
        "price": "$41.24 USD"
        "status": "open",
        "paymentDate": null,
        "items": [
            ...
        ]
        "actions": ["order-cancel", "order-payment", "order-update"]
    }

    This way we can communicate possible actions without the need of constructing links. In this case the response tells us that the client is able to perform cancel, payment and update operations.

    Note that this might not even increase coupling between the client and the server. Clients can still look up URIs for those actions in the API entry point without the need of hard-coding URIs.

    An alternative is to use standard link elements and just skip the href attribute:

    GET /orders/123
    {
        "id": 123,
        "price": "$41.24 USD"
        "status": "open",
        "paymentDate": null,
        "items": [
            ...
        ]
        "links": [
            { "rel": "order-cancel" },
            { "rel": "order-payment" },
            { "rel": "order-update" },
        ]
    }

    However, it might be a bit confusing to return a links element without links URIs.

    Obviously, you are leaving the standard path with both described ways. On the other side, if you don't need links you probably don't want to use a standardized HATEOAS response format (like HAL) either.


  • Thursday, 19 November, 2020

    Validation in Kotlin: Valiktor

    Bean Validation is the Java standard for validation and can be used in Kotlin as well. However, there are also two popular alternative libraries for validation available in Kotlin: Konform and Valiktor. Both implement validation in a more kotlin-like way without annotations. In this post we will look at Valiktor.

    Getting started with Valiktor

    First we need to add the Valiktor dependency to our project.

    For Maven:

    <dependency>
      <groupId>org.valiktor</groupId>
      <artifactId>valiktor-core</artifactId>
      <version>0.12.0</version>
    </dependency>

    For Gradle:

    implementation 'org.valiktor:valiktor-core:0.12.0'

    Now let's look at a simple example:

    class Article(val title: String, val text: String) {
        init {
            validate(this) {
                validate(Article::text).hasSize(min = 10, max = 10000)
                validate(Article::title).isNotBlank()
            }
        }
    }

    Within the init block we call the validate(..) function to validate the Article object. validate(..) accepts two parameters: The object that should be validated and a validation function. In the validation function we define validation constraints for the Article class.

    Now we try to create an invalid Article object with:

    Article(title = "", text = "some article text")
    

    This causes a ConstraintViolationException to be thrown because the title field is not allowed to be empty.

    More validation constraints

    Let's look at a few more example validation rules:

    validate(this) {
        
        // Multiple constraints can be chained
        validate(Article::authorEmail)
                .isNotBlank()
                .isEmail()
                .endsWith("@cool-blog.com")
    
        // Nested validation
        // Checks that Article.category.name is not blank
        validate(Article::category).validate {
            validate(Category::name).isNotBlank()
        }
    
        // Collection validation
        // Checks that no Keyword in the keywords collection has a blank name
        validate(Article::keywords).validateForEach {
            validate(Keyword::name).isNotBlank()
        }
    
        // Conditional validation
        // if the article is published the permalink field cannot be blank
        if (isPublished) {
            validate(Article::permalink).isNotBlank()
        }
    }

    Validating objects from outside

    In the previous examples the validation constraints are implemented within the objects init block. However, it is also possible to perform the validation outside the class.

    For example:

    val person = Person(name = "")
    
    validate(person) {
        validate(Person::name).isNotBlank()
    }

    This validates the previously created Person object and causes a ConstraintViolationException to be thrown (because name is empty)

    Creating a custom validation constraint

    To define our own validation methods we need two things: An implementation of the Constraint interface and an extension method. The following snippet shows an example validation method to make sure an Interable<T> does not contain duplicate elements:

    object NoDuplicates : Constraint
    
    fun <E, T> Validator<E>.Property<Iterable<T>?>.hasNoDuplicates()
            = this.validate(NoDuplicates) { iterable: Iterable<T>? ->
    
        if (iterable == null) {
            return@validate true
        }
    
        val list = iterable.toList()
        val set = list.toSet()
        set.size == list.size
    }

    This adds a method named hasNoDuplicates() to Validator<E>.Property<Iterable<T>?>. So this method can be called for fields of type Iterable<T>. The extension method is implemented by calling validate(..) with our Constraint and passing a validation function.

    In the validation function we implement the actual validation. In this example we simply convert the Iterable to a List and then the List to a Set. If duplicate elements are present both collections have a different size (a Set does not contain duplicate elements).

    We can now use our hasNoDuplicates() validation method like this:

    class Article(val keywords: List<Keyword>) {
        init {
            validate(this) {
                validate(Article::keywords).hasNoDuplicates()
            }
        }
    }

    Conclusion

    Valiktor is an interesting alternative for validation in Kotlin. It provides a fluent DSL to define validation rules. Thoes rules are defined in standard Kotlin code (and not via annotations) which makes it easy to add conditional logic. Valiktor comes with many predefined validation constraints. Custom constraints easily be implemented using extension functions.


  • Friday, 6 November, 2020

    REST: Sorting collections

    When building a RESTful API we often want to give consumers the option to order collections in a specific way (e.g. ordering users by last name). If our API supports pagination this can be quite an important feature. When clients only query a specific part of a collection they are unable to order elements on the client.

    Sorting is typically implemented via Query-Parameters. In the next section we look into common ways to sort collections and a few things we should consider.

    Sorting by single fields

    The easiest way is to allow sorting only by a single field. In this case, we just have to add two query parameters for the field and the sort direction to the request URI.

    For example, we can sort a list of products by price using:

    GET /products?sort=price&order=asc

    asc and desc are usually used to indicate ascending and descending ordering.

    We can reduce this to a single parameter by separating both values with a delimiter. For example:

    GET /products?sort=price:asc

    As we see in the next section, this makes it easier for us to support sorting by more than one field.

    Sorting by multiple fields

    To support sorting by multiple fields we can simply use the previous one-parameter way and separate fields by another delimiter. For example:

    GET /products?sort=price:asc,name:desc

    It is also possible to use the same parameter multiple times:

    GET /products?sort=price:asc&sort=name:desc

    Note that using the same parameter multiple times is not exactly described in the HTTP RFC. However, it is supported by most web frameworks (see this discussion on Stackoverflow).

    Checking sort parameters against a white list

    Sort parameters should always be checked against a white list of sortable fields. If we pass sort parameters unchecked to the database, attackers can come up with requests like this:

    GET /users?sort=password:asc

    Yes, this would possibly not be a real issue if passwords are correctly hashed. However, I think you get the point. Even if the response does not contain the field we use for ordering, the simple order of collection elements could lead to unintended data exposure.