mscharhag, Programming and Stuff;

A blog about programming and software development topics, mostly focused on Java technologies including Java EE, Spring and Grails.

  • Wednesday, 3 June, 2020

    Java Text Blocks

    Text Blocks are a JDK Enhancement Proposal (JEP 355) available as preview language feature in JDK 13 and 14. It is planned to become a permanent feature in JDK 15. A Text Block is a String literal that spans over multiple lines and avoids the need for most escape sequences.

    Motivation

    Embedding formats like XML, JSON or SQL in standard Java Strings can become quite annoying. For example, a simple snippet of JSON with just two keys is barely readable in Java because of required escaping:

    String json =
            "{\n" +
                "\"name\": \"john\",\n" +
                "\"age\": 42\n" +
            "}";

    Text Blocks for the rescue

    Using the new text blocks feature, we can rewrite our code to this:

    String text = """
            {
                "name": "john",
                "age": "42"
            }
            """;

    Text blocks are opened (and closed) using triple-quotes ("""). The text begins at the next line. After opening a text block, the rest of the line needs to stay empty.

    If we print this string to the console we see:

    {
        "name": "john",
        "age": "42"
    }

    As you might have been noticed, the indentation on the left side has been stripped away. That's because a text block is processed in three steps:

    • Line terminators are normalized to the LF character. This avoids problems between different platforms (like windows and unix).
    • Incidental leading white spaces and all trailing white spaces are removed. Incidental leading white spaces are determined by finding the common number of leading white spaces for all lines.
    • Escape sequences are interpreted. Text blocks can contain the same escape sequences as standard strings (e.g. \t or \n). Note that two new escape sequences have been added: \s for an explicit space and \<eol> as continuation indicator (more on \<eol> later).

    In case we explicitly need leading white spaces we can use the indent() method:

    String text = """
            {
                "name": "john",
                "age": "42"
            }
            """.indent(4);

    This adds 4 additional leading spaces to our JSON snippet. So it looks like this:

        {
            "name": "john",
            "age": "42"
        }
    

    Alternatively we can remove 4 leading spaces from the closing triple-quotes to produce the same result:

    String text = """
            {
                "name": "john",
                "age": "42"
            }
        """; // <-- moving this 4 spaces to the left produces 4 additional leading spaces

    The new \<eol> escape sequence

    With the new \<eol> escape sequence we can split the content of a single line into multiple lines without creating an actual line terminator.

    String text = """
            1
            2 \
            3 \
            4
            5
            """;
    

    Results in:

    1
    2 3 4
    5

    Escaping triple-quotes

    In case we need to write triple-quotes into a text block, only the first quote need to be escaped:

    String text = """
            Java text blocks start with \"""
            """;

    This produces:

    Java text blocks start with """

    Summary

    Text blocks are a nice addition to the Java programming language. They can greatly improve the readability of embedded strings like JSON, XML or SQL by supporting multiple lines a removing the need for double quote escaping.

    Recommended further reading: Text Blocks by Brian Goetz.

    As always you can find all the provided examples on GitHub.

  • Tuesday, 12 May, 2020

    Looking at Java Records

    JEP 359, available as preview feature in JDK 14, introduces records to Java. Records are an easy way to model plain data aggregates.

    A simple Range record looks like this:

    record Range(int from, int to) {}

    A record definition is literally the same as a final class with:

    • immutable fields
    • public accessors
    • a constructor
    • implementations for equals(), hashCode() and toString()

    So we can use our record like this:

    Range range = new Range(1, 5);
    
    int from = range.from(); // 1
    int to = range.to(); // 5
    String toString = range.toString(); // Range[from=1, to=5]
    boolean equals = range.equals(new Range(1, 5)); // true
    

    Note that the accessors are named from() and to() instead of getFrom() and getTo().

    What about constructors?

    Assume we want to add a constructor to our Record to perform some validation:

    record Range(int from, int to) {
        public Range(int from, int to) {
            if (from > to) {
                throw new IllegalArgumentException();
            }
            this.from = from;
            this.to = to;
        }
    }

    This avoids the creation of invalid Range instances. However, it is a bit annoying that we have to write down the from and to fields multiple times to perform a simple validation.

    To avoid this, we can use a special form of constructors for records, called compact constructors. This allows us to skip defining constructor parameters and assigning constructor parameters to fields. It looks like this:

    record Range(int from, int to) {
        public Range {
            if (from > to) {
                throw new IllegalArgumentException();
            }
        }
    }
    

    The result works exactly the same as the previous constructor.

    Custom methods

    We can also add new methods and override existing methods in records.

    For example:

    record Range(int from, int to) {
    
        public int getDistance() {
            return to - from;
        }
    
        @Override
        public String toString() {
            return String.format("Range[from: %s, to: %s, distance: %s]",
                    from, to, getDistance());
        }
    }

    Why are records useful?

    Records simply reduce the amount of code we have to write if we need a simple class to pass data around. Example use cases are multiple return values from a method, compound map keys or data transfer objects.

    Assume you want to find the minimum and maximum value in a collection. With a record you can create a return type for two values with just one line:

    record MinMax(int min, int max) {}
    
    static MinMax minMax(Collection<Integer> numbers) { ... }

    (Yes, you can use separate methods to find the minimum and maximum values. However, then you have to iterate the collection twice)

    Records also provide an easy way to create compound Map keys:

    record NameAndDayOfBirth(String name, LocalDate dob) {}
    
    private Map<NameAndDayOfBirth, Person> entries = ...;

    Summary

    Records provide a less verbose way to create simple data holders. Common use cases are multiple return values, compound map keys or data transfer objects. For more background on records I recommend this writing by Brian Goetz.

    You can find the example code on GitHub.

  • Wednesday, 6 May, 2020

    REST / Using feeds to publish events

    Dealing with events

    When working with multiple decoupled services (e.g. in a micro service architecture) it is very likely that you need a way to publish some sort of domain event from one service to one or multiple other service(s).

    Many widely adopted solutions rely on a separate piece of infrastructure to solve this problem (like an event bus or message queues).

    Event feeds

    Another approach to this problem is the use of feeds. Feeds like RSS or ATOM are typically used to subscribe to web pages. Whenever a new article is published to a subscribed web page a feed reader application (e.g. browser add-on or mobile app) can inform the user about the new article. Feed readers typically poll a provided feed endpoint in regular intervals to see if new articles are available.

    Instead of publishing new articles to RSS-Readers we can use a feed to publish events to other services. This requires no additional infrastructure besides a standard database to store events (which you might already have).

    RSS and ATOM are both XML formats and therefore not a good fit if we want to provide a JSON API. There is also JSON Feed, which is similar to RSS and ATOM but uses JSON. Like RSS and ATOM, JSON Feed focuses on website contents, therefore many (optional) feed and feed item properties are not very useful for publishing domain events (like favicon, content_html, image, banners and attachments). However, JSON Feed has a simple extension mechanism that allows us to define custom fields in our feeds. These fields have to start with an underscore. If JSON Feed does not match your needs, you can also come up with your own feed format, which should not be that hard.

    An example JSON Feed with two published domain events might look like this:

    {
      "version": "https://jsonfeed.org/version/1",
      "title": "user service events",
      "feed_url": "http://userservice.myapi.com/events",
      "next_url": "http://userservice.myapi.com/events?offset=2", 
      "items": [
        {
          "id": "42",
          "url": "http://userservice.myapi.com/user/123",
          "date_published": "2020-05-01T14:00:00-07:00",
          "_type": "NameChanged",
          "_data": {
            "oldName" : "John Foo",
            "newName" : "John Bar"
          }
        }, {
          "id": "43",
          "url": "http://userservice.myapi.com/user/789",
          "date_published": "2020-05-02T17:00:00-03:00",
          "_type": "UserDeleted",
          "_data": {
            "name" : "Anna Smith",
            "email" : "anna@smith.com"
          }
        }
      ]
    }

    The first event (with id 42) indicates that the name of the user resource /user/123 has been changed. Within the _data block we provide some additional event information that might be useful for the subscriber. The second event indicates that the resource /user/789 has been deleted, the _data block contains the deleted user data. _type and _data are not defined in the JSON Feed format and therefore start with an underscore (the JSON Feed extension format).

    The feed property next_url can be used to provide some sort of pagination. It tells the client where to look for more events after all events in the current feed have been processed. Our feed contains only two events, so we tell the client to call the feed endpoint with an offset parameter of two to get the next events.

    General considerations

    If you use JSON Feed or if you come up with your own feed format, here are some general things you should consider, when building a feed to publish events:

    Feed items are immutable

    Feed items represent domain events, which are immutable. When necessary, clients can use the unique feed item id to check if they already processed a feed item.

    The feed item order is not modified

    The order of the items in the feed is not changed. Newer items are appended to the end of the feed.

    Clients should be able to request only the feed items they have not processed so far.

    To avoid that clients need to process all feed items over and over again to see if new items are available (e.g. by checking the date_published item property), the feed should provide a way to return only the new items. When using JSON Feed this can be accomplished with the next_url property.

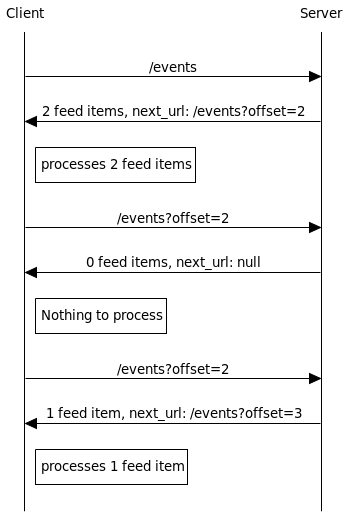
    The following diagram tries to visualize a possible next_url behavior:

    At the first feed request only two events might be available. Both are returned by the server, together with a next_url that contains an offset parameter of 2. After the client has processed both feed items, it requests the next items using an offset of 2. No new items are available, so an empty feed without a new next_url is returned by the server. The client remembers the previous next_url and retries the request some time later again. This time a new item is returned with an updated next_url containing an offset of 3.

    Of course you can come up with different ways of accomplishing the same result.

    And performance?

    Obviously a feed cannot compete with any high throughput messaging solutions from a performance point of view. However, I think it would be enough for many use cases. If it reduces the complexity of your system, it might be a worthy trade off.

    Things to consider are:

    • The number of events created by the server
    • The number of feed subscribers
    • The amount of data associated with an event
    • The acceptable delay between publishing and processing of an event. This defines the polling interval for subscribers

    Due to the immutable nature of domain events, caching of events can be an option on the server to reduce database lookups. Long polling and conditional GET requests are possible options to reduce network load.

    Conclusion

    Feeds provide an alternative way of publishing events to other systems using a REST API without additional infrastructure besides a database to store events. You can use existing feed formats like JSON Feed or come up with your own custom feed format.

    Because of the polling nature of a feed this solution is probably not the best choice if you have tons of events and a lot of consumers.
     

  • Monday, 20 April, 2020

    Java 14: Looking at the updated switch statement

    JDK 14, released in March 2020, comes with an updated version of the switch statement. This has been a preview feature in JDK 12 and JDK 13.

    To see the difference, let's look at a simple example. Assume we want to compute the daily working time based on a DayOfWeek enum.

    With the old way of using the switch statement, our solution might look like this:

    DayOfWeek day = ...
    float expectedWorkingTime;
    
    switch (day) {
    	case MONDAY:
    	case TUESDAY:
    	case WEDNESDAY:
    	case THURSDAY:
    		expectedWorkingTime = 8f;
    		break;
    	case FRIDAY:
    		expectedWorkingTime = 6f;
    		break;
    	default:
    		expectedWorkingTime = 0f;
    }
    

    With the new switch statement (or expression) we can rewrite our example like this:

    DayOfWeek day = ...
    
    final float expectedWorkingTime = switch (day) {
    	case MONDAY, TUESDAY, WEDNESDAY, THURSDAY -> 8f;
    	case FRIDAY -> 6f;
    	default -> 0f;
    };
    

    So, what's new:

    • The switch keyword can be used as expression and return a value. In this example the value returned by switch is assigned to expectedWorkingTime. Note that this allows us to make expectedWorkingTime final which was not possible in the previous solution.
    • A case statement can contain multiple values, separated by comma.
    • In the case statement, colon is replaced with an arrow (->)
    • When using the arrow (->) syntax, no break keyword is required. If you prefer using break, you can still use the older colon syntax for cases.

    The new yield statement

    In the previous example we return a simple value on the right side of the arrow (->). However, maybe we need to compute this value first, for which we might need a few extra lines of code.

    For example:

    final float expectedWorkingTime = switch (day) {
    	case MONDAY, TUESDAY, WEDNESDAY, THURSDAY -> {
    		if (isFullTimeEmployee) {
    			yield 8;
    		}
    		yield 4;
    	}
    	case FRIDAY -> 6f;
    	default -> 0f;
    };
    

    Here we use a code block in the first case statement to determine the working time. With the new yield statement we return a value from a case block (like using return in methods).

    You can find the examples shown in this post on GitHub.

  • Sunday, 23 February, 2020

    Composing custom annotations with Spring

    Java Annotations were introduced with Java 5 back in 2004 as a way to add meta data into Java source code. Today many major frameworks like Spring (including Spring Boot) or Hibernate heavily rely on annotations.

    In this post we will have a look at a very useful Spring feature which allows us to create our own annotations based on one or more Spring annotations.

    Composing a custom annotation

    Assume we have a set of Spring annotations we often use together. A common example is the combination of @Service and @Transactional:

    @Service
    @Transactional(rollbackFor = Exception.class, timeout = 5)
    public class UserService {
        ...
    }

    Instead of repeating both annotations over and over again, we can create our own annotation containing these two Spring annotations. Creating our own annotation is very easy and looks like this:

    @Service
    @Transactional(rollbackFor = Exception.class, timeout = 5)
    @Retention(RetentionPolicy.RUNTIME)
    public @interface MyService {}

    An annotation is defined with the @interface keyword (instead of class or interface). The standard Java Annotation @Retention is used to indicate that the annotation should be processable at runtime. We also added both Spring annotations to our annotation.

    Now we can use our own @MyService annotations to annotate our services:

    @MyService
    public class UserService {
        ...
    }

    Spring now detects that @MyService is annotated with @Service and @Transactional and provides the same behaviour as the previous example with both annotations present at the UserService class.

    Note that this is a feature of Spring's way of annotation processing and not a general Java feature. Annotations of other frameworks and libraries might not work if you add them to your own annotation.

    Example use cases

    Custom annotations can be used in various situations to improve the readability of our code. Here are two other examples that might come in handy.

    Maybe we need a property value in various locations of our code. Properties are often injected using Spring's @Value annotation:

    // injects configuration properties my.api.key
    @Value("${my.api.key}") 
    private String apiKey;

    In such a situation we can move the property expression out of our code into a separate annotation:

    @Value("${my.api.key}")
    @Retention(RetentionPolicy.RUNTIME)
    public @interface ApiKey {}

    Within our code we can now use @ApiKey instead of repeating the property expression everywhere:

    @ApiKey
    private String apiKey;

    Another example are integration tests. Within tests often various Spring annotations are used to define the test setup. These annotations can be grouped together using a custom annotation. For example, we can create a @MockMvcTest annotations that defines the Spring setup for mock mvc tests:

    @SpringBootTest
    @AutoConfigureMockMvc(secure = false)
    @TestPropertySource(locations = "classpath:test.properties")
    @ExtendWith(SpringExtension.class)
    @Retention(RetentionPolicy.RUNTIME)
    public @interface MockMvcTest {}

    The definition of our tests look a lot cleaner now. We just have to add @MockMvcTest to get the complete test setup:

    @MockMvcTest
    public class MyTest {
    	...
    }

    Note that our @MockMvcTest annotation also contains the @ExtendWith annotation of JUnit 5. Like Spring, JUnit 5 is also able to detect this annotation if it is added to your own custom annotation. Be aware that this will not work if you are still using JUnit 4. With JUnit 4 you have to use @RunWith instead of @ExtendWith. Unfortunatelly @RunWith only works when placed directly at the test class.

    Examples in Spring

    Spring uses this feature in various situations to define shortcuts for common annotations.

    Here are a few examples:

    • @GetMapping is the short version for @RequestMapping(method = {RequestMethod.GET}).
    • @RestController is a composition of @Controller and @ResponseBody.
    • Spring Boots @SpringBootApplication is a shortcut for @SpringBootConfiguration, @EnableAutoConfiguration and @ComponentScan

    You can verify this yourself by looking into the definition of these annotations in Spring's source code.