mscharhag, Programming and Stuff;

A blog about programming and software development topics, mostly focused on Java technologies including Java EE, Spring and Grails.

  • Monday, 29 June, 2020

    IntelliJ's text based HTTP client

    IntelliJ provides a HTTP client that is purely text based. While this might sound strange at the beginning it turns out that this is a very useful feature.

    Getting started

    First we need to create a file whose name ends with .http or .rest. For example: my-requests.http.

    To issue a simple GET request we have to write down the request in our newly created file.

    For example:

    GET http://localhost:8080/products

    IntelliJ now adds a small Run-Icon next to the line which allows you to execute the request.

    IntelliJ showing a run-icon next to the HTTP request line


    If we want to POST a piece of JSON, we simply have to add a Content-Type header and the request body:

    POST http://localhost:8080/products
    Content-Type: application/json
    
    {
      "name": "My other Product",
      "description": "hu?"
    }
    

    Please note that there has to be a blank line between headers and request body.

    Of course IntelliJ has syntax highlighting and auto completion for writing down headers and JSON:
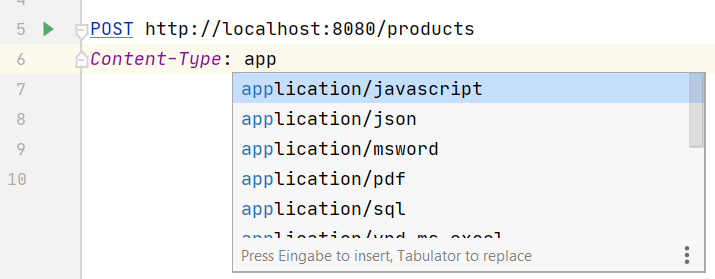
    IntelliJ showing Syntax-completion for HTTP request headers


    Multiple requests in the same file need to be separated with ###. For example:

    GET http://localhost:8080/products
    
    ###
    
    POST http://localhost:8080/products
    Content-Type: application/json
    
    {
      "name": "My other Product",
      "description": "hu?"
    }

    Using variables

    With {{ .. }} we can add variables to our requests. Maybe we want to issue the same request against different environments. To support this, we can update our request with a host variable:

    GET http://{{host}}/products

    Next we need to define the {{host}} variable. For this we create a http-client.env.json file and add the following content:

    {
      "development": {
        "host": "http://localhost:8080"
      },
      "production": {
        "host": "http://my-cool-api.com"
      }
    }

    This defines two environments: development and production. Both environments define the host variable with a different value.

    When running the request, we can now choose the environment we want:

    IntelliJ showing environment in run options for HTTP request


    Share requests with your team

    The simple text-based request definition allows easy sharing with your team. You can even check in request files into your version control system. Of course you do not want to check in passwords or API keys that might be needed for request execution. IntelliJ supports this with a separate private environment file (http-client.private.env.json). Like in the previous environment example, we can use this file to define variables.

    For example:

    {
      "dev": {
        "api-key": "S3CR3T"
      }
    }

    To make sure no secrets are checked in, we can explicitly exclude this file from our version control system.


  • Monday, 22 June, 2020

    REST: Creating resources

    Resource creation is a common REST API operation. In this post we will see how single resource can be created.

    The client request

    Resources are typically created by sending a POST request to the parent collection resource. This creates a new subordinate resources with a newly generated id.

    For example, a POST request to /projects might be used to create a new project resource at /projects/123.

    POST is not idempotent, so it is fine to create multiple resources if the same request is issued multiple times. (If you don't know what idempotency is, have a look at my post about idempotency and safety).

    In rare cases, where the client is able to generate a resource id it might also be possible to use PUT for resource creation. For example, in this case we can use PUT /projects/<id> to create a new project.

    Clients must also send the following headers:

    • Content-Type to specify the media type of the request body
    • Accept to define supported response formats. Even if the server does not return the newly created resource, this header should be sent. It allows the server to send detailed error information if resource creation fails.

    Example request

    POST /projects
    Content-Type: application/json
    Accept: application/json
    
    {
        "name": "My cool project",
        "description": "Bla bla .."
    }

    The server response

    After a resource has been created successfully, the server should respond with HTTP 201 (Created). The response should also have a Location header that contains the URI of the newly created resource. When needed, the response body can contain the created resource. In this case, a Content-Type header is also required.

    Example response

    HTTP/1.1 201 Created
    Location: /projects/123
    Content-Type: application/json
    
    {
        "id" : 123,
        "name": "My cool project",
        "description": "Bla bla .."
    }
    
  • Wednesday, 17 June, 2020

    Kotlin infix functions

    What are infix functions?

    If you are using Kotlin chances are high you already used infix functions. Maybe without knowing it.

    When calling infix functions it is possible to omit the dot and the parentheses. So instead of

    car.move(forward)

    we can write:

    car move forward

    Here are a few examples of commonly used infix functions in Kotlin. The standard call notation (including dot and parentheses) for these functions is shown as comment.

    val map = mapOf(
        "foo" to 42     // "foo".to(42)
    )
    
    for (i in 0 until 5) {  // 0.until(5)
        ...
    }
    
    val regex = Regex("\\w")
    if ("foo" matches regex) {  // "foo".matches(regex)
    
    }
    

    Writing your own infix function

    Of course we can write our own infix functions.

    Infix functions must satisfy the following requirements:

    • They must be member functions or extension functions
    • They must have a single parameter
    • The parameter must not accept variable number of arguments and must have no default value

    To create an infix function we have to add the infix keyword to the function signature.

    For example:

    enum class TurnDirection { left, right }
    
    class Car {
        infix fun turn(turnDirection: TurnDirection) { ... } // our infix function
    }
    
    fun main() {
        val car = Car()
        car turn left // infix function call, static import of "left" required   
    }


    If we return an object that contains an infix function itself, we can chain infix function calls.

    For example:

    class TurnDirectionBuilder {
        infix fun then(turnDirection: TurnDirection) { ... }
    }
    
    class Car {
        infix fun turn(turnDirection: TurnDirection): TurnDirectionBuilder {
            return TurnDirectionBuilder()
        }
    }
    
    fun main() {
        val car = Car()
        car turn left then right // same as: car.turn(left).then(right)
    }
    

    A common example of this in Kotlin is the IntProgression.step() function that might be used in for loops.

    For example:

    for (i in 0 until 10 step 2) { .. }  // same as: 0.until(10).step(2) 


  • Monday, 15 June, 2020

    REST: Managing Many-To-Many relations

    Introduction

    Managing relations between multiple resources can be an essential part of an RESTful API. In this post we will see how many-to-many relationships can be managed with a REST API.

    We use a simple user / group relation as an example. Let's assume users and groups are two separate resources (e.g. /users and /groups) and we want to provide a way to manage the relationship described by the following points:

    • A user can be added to multiple groups
    • A group can contain multiple users
    • Users can only be added once to a group


    Many-to-Many relations can be divided into two different types:

    • Relations without additional information besides the actual relation
    • Relations that contain additional data. In our example this can be something like a group member status (e.g. a user is a moderator in one group and a simple member in another group)

    In this post we will only look at the first type of relation. Relations with additional data will be covered in a future post.

    Of course there is no single correct solution to this problem. The next section describes the approach I made the best experience with. After that, we will have a look at some alternative solutions.

    Modeling sub-resources and GET operations

    First we introduce two sub resources:

    • /users/<user-id>/groups represents the groups assigned to the user with id <user-id>
    • /groups/<group-id>/users represents the users assigned to the group with id <group-id>

    Using the GET verb we can now request both collections.

    Getting users assigned to a specific group:

    GET /groups/<group-id>/users

    Getting groups assigned to a specific user:

    GET /users/<user-id>/groups

    Adding and Removing users

    Now we need a way to add a user to a group. We do this using the PUT verb.

    Adding a user to a group:

    PUT /groups/<group-id>/users/<user-id>

    No request body is needed for this operation.

    For example, this adds user 32 to group 21:

    PUT /groups/21/users/32

    Note, here we need to ask the question if adding a user to a group is idempotent. In our example this operation is idempotent: A user can only be added once to a group. Therefore, we use the PUT verb. If the assignment operation is not idempotent (e.g. a user can be added multiple times to a group) we have to use POST instead of PUT.

    You can read more on idempotency and the difference between POST and PUT in my other posts.

    As an alternative we can also model this operation from the /users perspective if we want.

    Adding a group to a user:

    PUT /users/<user-id>/groups/<group-id>

    To remove a user from a group we use the DELETE verb.

    Removing a user from a group:

    DELETE /groups/<group-id>/users/<user-id>

    For example, this removes user 32 from group 21:

    DELETE /groups/21/users/32

    or vice versa, from the /users side:

    Removing a group from a user:

    DELETE /users/<user-id>/groups/<group-id>

    Note, while we perform PUT and DELETE operations on /groups/<group-id>/users/<user-id> there is no need to implement GET for this URI. GET /groups/21/users/32 would simply return the same result as GET /users/32 (as long as the user is part of the given group)

    Alternative solutions

    Introducing a separate /group-members resource

    Another approach is to create a completely separate resource that manages the relation between users and groups.

    Adding a user to a group might look like this:

    POST /group-members
    {
        groupId: 31,
        userId: 23
    }

    To get the users assigned to a given group, we can use a similar request as in our previous solution:

    GET /groups/<group-id>/members

    However, this time it returns a list of group-member resources.

    This approach creates a bit more complexity (we add a completely new resource that might have its own identifier). However, it is especially useful if we want to add some additional information to the relation (e.g. the join-date of a user). We will have a closer look at this in a future post, when look at relations with additional data.

    Managing relations as part of normal resource updates

    Another approach is to use the standard update operation to manage relations. For example:

    PUT /users/23
    {
        "name" : "John",
        "groups" : [
            { "id" : "42" },
            { "id" : "43" }
        ]
    }

    While this can work fine in certain situations, I cannot recommend this approach.

    Resources and relations are often changed independent from each other. Merging both operations together can cause various problems. For example, from the security perspective both operations might need different permissions. A client might be allowed to a add a user to a group but might not have permissions to update the user itself.

    With a lot of relations this approach can also be very troublesome for performance. So it is typically better to provide separate operations for updating resources and relations.

  • Friday, 12 June, 2020

    Kotlin / IntelliJ quick hint: Operator navigation

    This is just a quick hint if you are programming Kotlin with IntelliJ:

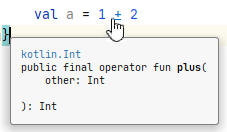
    In IntelliJ you can ctrl-click on operators to navigate to the operator definition (similar to ctrl-clicking on methods).

    Intellij-kotlin-operator

    This also works for the get operator (you can click on the [] brackets) and for ranges (you can click on the dots (..) between the start and end values).